
Are you ready to transform your kitchen into a pizzeria? Making your own Homemade Classic Pizza is not only a fun activity but also a rewarding experience. With just six simple ingredients, you can create a delicious pizza that caters to your family’s tastes and dietary needs. This recipe is both cost-effective and customizable, making it perfect for budget-conscious cooks and pizza lovers alike. Moreover, using fresh ingredients promotes healthier eating, allowing you to enjoy a beloved dish without the guilt. So, gather your loved ones and let’s dive into the delightful world of homemade pizza!
Table of Contents
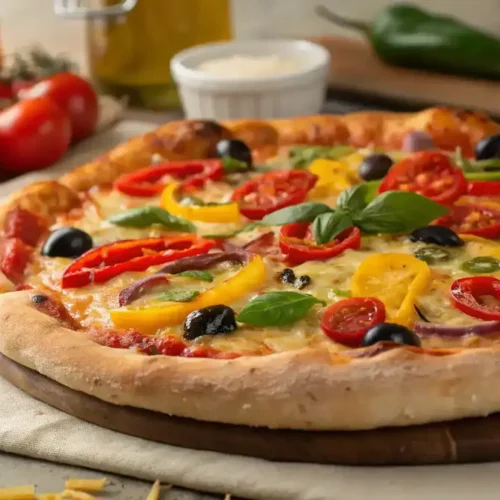
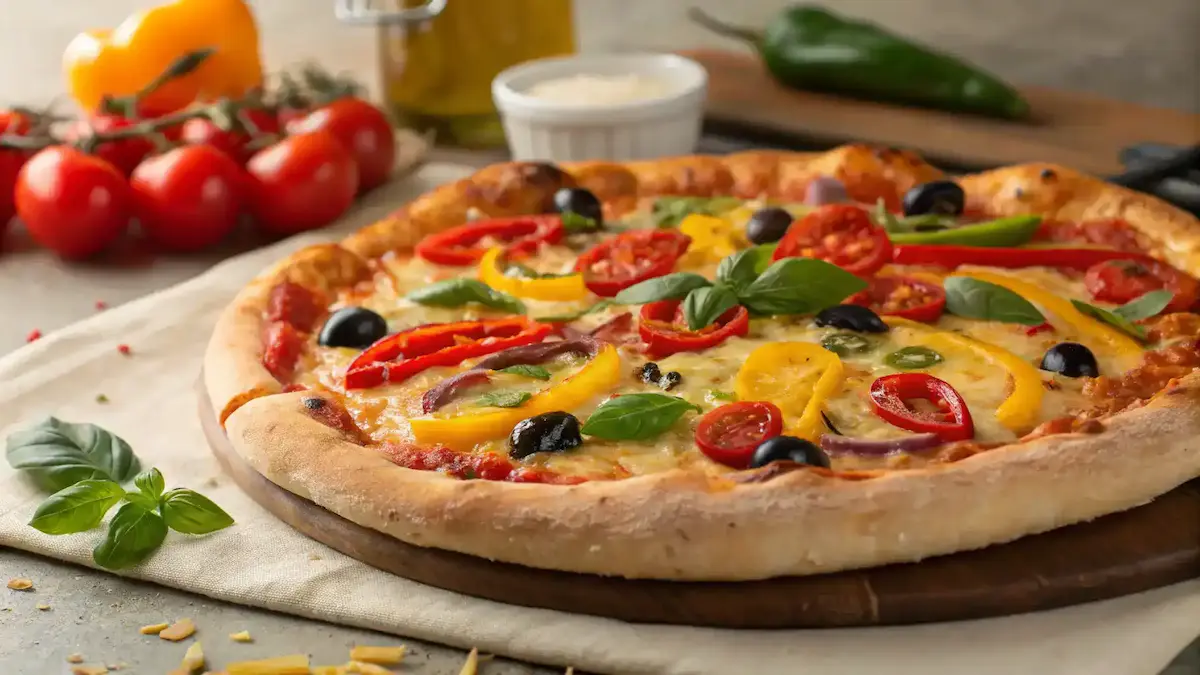
Homemade Classic Pizza
Equipment
- 1 Mixing bowl For combining ingredients.
- 1 Rolling Pin For rolling out the dough.
- 1 Baking Sheet or Pizza Stone For baking the pizza.
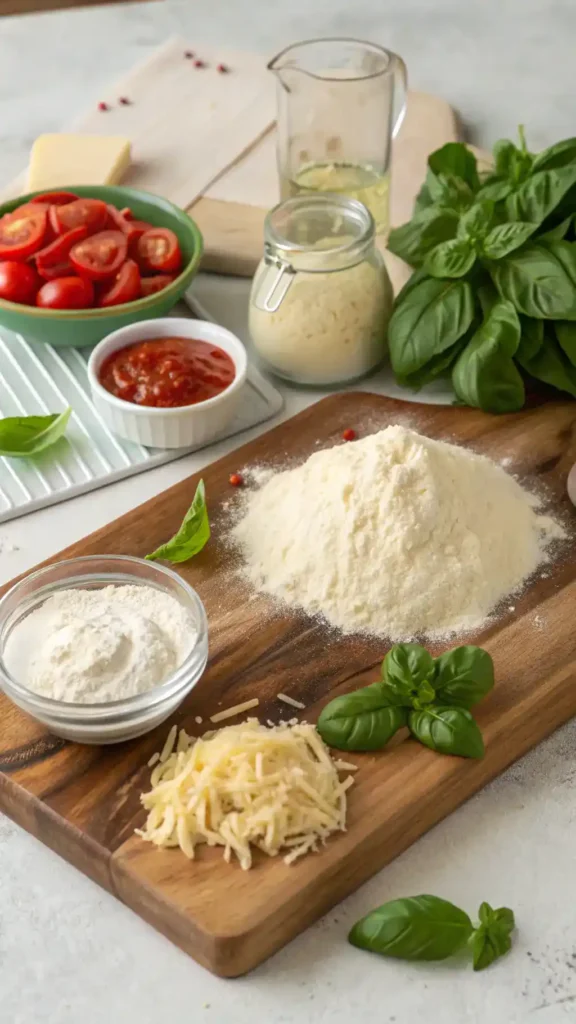
Ingredients
Dry Ingredients
- 2 cups all-purpose flour A great source of carbohydrates.
- 1 packet (2 ¼ teaspoons) active dry yeast Helps the dough rise.
- 1 teaspoon salt Enhances flavor and regulates hydration.
Wet Ingredients
- ¾ cup warm water Activates the yeast.
- 1 tablespoon olive oil Rich in healthy fats.
Toppings
- 1 cup shredded mozzarella cheese Provides calcium and protein.
- to taste fresh basil leaves (optional) Adds flavor and antioxidants.
Instructions
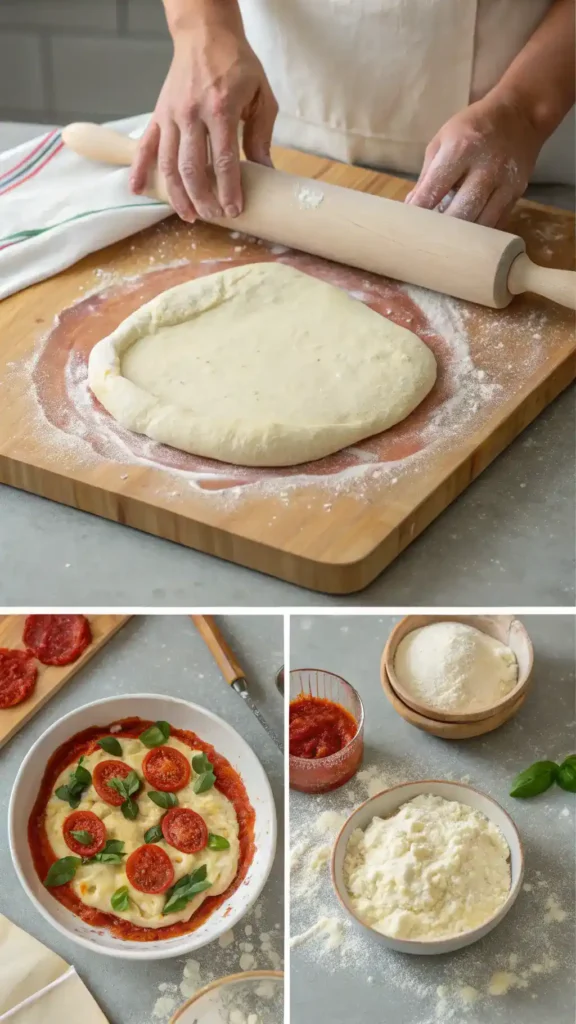
Prepare the Dough
- In a mixing bowl, combine 2 cups of all-purpose flour, 1 packet of active dry yeast, and 1 teaspoon of salt. Mix these dry ingredients together. Then, add ¾ cup of warm water and 1 tablespoon of olive oil. Stir until a dough forms.
Knead the Dough
- Transfer the dough onto a floured surface. Knead it for about 5-7 minutes until it becomes smooth and elastic.
Let it Rise
- Place the kneaded dough in a lightly greased bowl. Cover it with a clean kitchen towel and let it rise in a warm place for about 30 minutes.
Preheat the Oven
- While the dough is rising, preheat your oven to 475°F (245°C).
Roll Out the Dough
- Once the dough has risen, punch it down to release the air. Roll out the dough into your desired shape, about ¼ inch thick.
Add the Sauce
- Spread a generous layer of tomato sauce over the rolled-out dough, leaving a small border around the edges.
Top with Cheese
- Sprinkle shredded mozzarella cheese over the sauce.
Add Toppings
- Add your favorite toppings, such as sliced bell peppers or mushrooms.
Bake the Pizza
- Transfer the pizza onto a baking sheet or pizza stone. Bake for about 12-15 minutes, or until the crust is golden brown.
Cool and Serve
- Remove the pizza from the oven and let it cool for a few minutes. Cut into wedges and serve hot.
Video
Notes
| Calories | Fat | Protein | Carbs |
|---|---|---|---|
| 250 | 10g | 12g | 30g |
Key Benefits
Homemade Classic Pizza is not just a delicious meal; it also brings a multitude of benefits that make it a fantastic choice for any pizza lover. Firstly, this recipe is incredibly cost-effective. By making your own pizza, you can save money compared to ordering out. Additionally, you have complete control over the ingredients, allowing you to create a healthier version that suits your dietary needs. Here are some key benefits:
- Customizable: You can tailor your Homemade Classic Pizza to fit your taste preferences. Whether you prefer a veggie-loaded pie or a classic Margherita, the choice is yours!
- Health Benefits: By using fresh ingredients, you can significantly reduce preservatives and unhealthy additives. This means you can enjoy a guilt-free indulgence that is both satisfying and nutritious.
- Family-Friendly: Making pizza at home is a fun activity for the whole family. Kids can help with topping choices, making it a great way to bond while preparing a meal together.
- Quick Meal: With just six simple ingredients, you can whip up a delicious Homemade Classic Pizza in no time. This makes it an ideal option for busy weeknights or spontaneous gatherings.
- Promotes Culinary Creativity: Experimenting with different toppings and flavors can enhance your cooking skills. You might discover new combinations that become family favorites!
In conclusion, Homemade Classic Pizza not only satisfies your cravings but also supports healthier eating habits and fosters family connections. So, gather your loved ones, roll up your sleeves, and enjoy the delightful process of creating your own pizza masterpiece!
Ingredients for Homemade Classic Pizza
Creating a delicious Homemade Classic Pizza starts with simple, wholesome ingredients. Each component not only contributes to the flavor but also offers health benefits that make your pizza night a little more nutritious. Here’s what you’ll need:
- 2 cups all-purpose flour: A great source of carbohydrates, providing energy for your day. You can also opt for whole wheat flour for added fiber.
- 1 packet (2 ¼ teaspoons) active dry yeast: This ingredient helps your dough rise, making it light and airy. Yeast also contains B vitamins, which are essential for energy metabolism.
- ¾ cup warm water: Hydration is key! Warm water activates the yeast, ensuring a perfect rise.
- 1 tablespoon olive oil: Rich in healthy fats, olive oil supports heart health and adds a delightful flavor to your crust.
- 1 teaspoon salt: Not only does salt enhance flavor, but it also helps regulate hydration and supports nerve function.
- 1 cup shredded mozzarella cheese: A classic topping that provides calcium and protein, essential for strong bones and muscles. You can also use part-skim mozzarella for a lighter option.
- Fresh basil leaves (optional): These aromatic leaves add a burst of flavor and are packed with antioxidants, promoting overall health.
With these straightforward ingredients, you can easily whip up a Homemade Classic Pizza that’s not only cost-effective but also customizable to suit your family’s tastes. Whether you prefer a classic Margherita or a veggie-loaded delight, the possibilities are endless!
How to Make Homemade Classic Pizza
Making your own Homemade Classic Pizza is a fun and rewarding experience. Follow these simple steps to create a delicious pizza that you can customize to your liking. Let’s get started!
- Prepare the Dough: In a mixing bowl, combine 2 cups of all-purpose flour, 1 packet of active dry yeast, and 1 teaspoon of salt. Mix these dry ingredients together. Then, add 3/4 cup of warm water and 1 tablespoon of olive oil. Stir until a dough forms. This is the foundation of your Homemade Classic Pizza.
- Knead the Dough: Transfer the dough onto a floured surface. Knead it for about 5-7 minutes until it becomes smooth and elastic. If the dough is sticky, sprinkle a little more flour. This step is crucial for achieving the perfect texture.
- Let it Rise: Place the kneaded dough in a lightly greased bowl. Cover it with a clean kitchen towel and let it rise in a warm place for about 30 minutes. During this time, the dough will double in size, making it light and airy.
- Preheat the Oven: While the dough is rising, preheat your oven to 475°F (245°C). A hot oven is essential for a crispy crust, so don’t skip this step!
- Roll Out the Dough: Once the dough has risen, punch it down to release the air. Then, transfer it back to the floured surface. Using a rolling pin, roll out the dough into your desired shape, whether it’s round or rectangular. Aim for about 1/4 inch thick for a classic pizza crust.
- Add the Sauce: Spread a generous layer of tomato sauce over the rolled-out dough. Leave a small border around the edges for the crust. You can use store-bought sauce or make your own for a fresher taste.
- Top with Cheese: Sprinkle a generous amount of shredded mozzarella cheese over the sauce. Feel free to add more or less cheese based on your preference. This is where your Homemade Classic Pizza starts to come to life!
- Add Toppings: Now comes the fun part! Add your favorite toppings, such as sliced bell peppers, mushrooms, or fresh basil. Remember, the sky’s the limit when it comes to customizing your pizza!
- Bake the Pizza: Carefully transfer the pizza onto a baking sheet or pizza stone. Bake in the preheated oven for about 12-15 minutes, or until the crust is golden brown and the cheese is bubbly. Keep an eye on it to avoid burning!
- Cool and Serve: Once baked, remove the pizza from the oven and let it cool for a few minutes. This will make it easier to slice. Cut into wedges and serve hot. Enjoy your Homemade Classic Pizza with family and friends!
By following these steps, you’ll create a delightful Homemade Classic Pizza that’s not only cost-effective but also customizable to suit your tastes. Happy pizza-making!
Pro Tips, Variations, and Common Problems
Making Homemade Classic Pizza is a delightful experience, but it can come with its challenges. Here are some expert tips and creative variations to ensure your pizza night is a success!
Expert Tips
– Dough Consistency: If your dough feels too sticky, add a little more flour, but do so gradually. Conversely, if it’s too dry, a splash of water can help. The right texture is key for a perfect crust.
– Preheat Your Oven: Always preheat your oven to the highest temperature, ideally around 475°F (245°C). This ensures a crispy crust. Additionally, using a pizza stone can enhance the baking process.
– Don’t Overload Toppings: While it’s tempting to pile on toppings, too many can lead to a soggy pizza. Instead, aim for a balanced approach with just enough toppings to complement the cheese and sauce.
Creative Variations
– Dough Alternatives: For a gluten-free option, substitute regular flour with a gluten-free blend. You can also try cauliflower crust for a low-carb alternative.
– Sauce Swaps: Instead of traditional tomato sauce, consider using pesto, barbecue sauce, or even a white garlic sauce for a unique flavor twist.
– Cheese Choices: While mozzarella is classic, feel free to mix it up! Try provolone, gouda, or even a sprinkle of feta for a gourmet touch.
– Topping Ideas: Experiment with various toppings such as grilled vegetables, fresh herbs, or even fruits like pineapple or figs. Each addition can transform your Homemade Classic Pizza into a new culinary adventure.
Troubleshooting Common Problems
– Soggy Crust: If your pizza crust turns out soggy, it may be due to excess moisture from toppings. To avoid this, pat vegetables dry before adding them. Also, consider pre-baking the crust for a few minutes before adding toppings.
– Burnt Cheese: If your cheese is burning before the crust is done, try covering the pizza loosely with aluminum foil. This will protect the cheese while allowing the crust to finish baking.
– Dough Not Rising: If your dough doesn’t rise, it may be due to inactive yeast. Always check the expiration date on your yeast, and ensure your water is warm (not hot) when mixing.
By following these tips and variations, you’ll be well on your way to mastering Homemade Classic Pizza. Remember, the joy of pizza-making lies in experimentation, so don’t hesitate to try new ingredients and techniques!
Serving Suggestions
Homemade Classic Pizza is not just a meal; it’s an experience that brings people together. Whether you’re hosting a casual family dinner or a lively game night, this delightful dish fits perfectly into various occasions. Here are some serving suggestions to elevate your pizza night:
- Family Gatherings: Serve your Homemade Classic Pizza alongside a fresh Caesar salad. The crisp greens and creamy dressing complement the rich flavors of the pizza beautifully.
- Game Day: Cut your pizza into bite-sized squares and pair it with a variety of dipping sauces, such as marinara or garlic butter. This makes for easy snacking while cheering on your favorite team!
- Casual Dinner Parties: Create a pizza bar with an array of toppings. Invite guests to customize their own slices, making the meal interactive and fun. This approach is especially appealing to pizza lovers and families alike.
- Picnics: Pack slices of your Homemade Classic Pizza in a picnic basket. It’s a cost-effective and delicious option that travels well, ensuring you enjoy a delightful meal outdoors.
- Movie Nights: Serve your pizza with a side of popcorn for a cozy night in. The combination of flavors will surely impress your guests and create a memorable evening.
Additionally, consider garnishing your pizza with fresh herbs like basil or oregano right before serving. This not only enhances the visual appeal but also adds a burst of flavor. Overall, these serving suggestions will help you create a warm, inviting atmosphere that showcases your Homemade Classic Pizza as the star of the meal.
Preserving and Reheating Your Homemade Classic Pizza
When it comes to enjoying your Homemade Classic Pizza, knowing how to store and reheat it properly is essential. Not only does this maintain its delicious flavor, but it also preserves that perfect texture you worked so hard to achieve. Here are some friendly tips to help you keep your pizza fresh and tasty!
Storage Tips
To store your Homemade Classic Pizza, start by allowing it to cool completely. Once cooled, wrap each slice in plastic wrap or aluminum foil. Alternatively, you can place the slices in an airtight container. This method helps to keep moisture in and prevents the pizza from drying out. If you plan to eat it within a few days, store it in the refrigerator, where it will stay fresh for up to 3-4 days. For longer storage, consider freezing your pizza. Wrap each slice tightly and place them in a freezer-safe bag or container. Properly stored, your pizza can last for up to 2-3 months in the freezer. Remember, always label your containers with the date to keep track of freshness!
Additionally, food safety is crucial. Always refrigerate your pizza within two hours of baking to prevent bacterial growth. If you notice any off smells or unusual textures, it’s best to err on the side of caution and discard it.
Reheating Methods
When it’s time to enjoy your leftover Homemade Classic Pizza, reheating it correctly is key to retaining its deliciousness. The oven is one of the best methods for reheating pizza. Preheat your oven to 375°F (190°C). Place your pizza slices directly on the oven rack or on a baking sheet for about 10-15 minutes. This method helps to crisp up the crust while warming the toppings evenly. If you prefer a quicker option, the stovetop works wonders too. Heat a non-stick skillet over medium heat. Add your pizza slice and cover it with a lid. Heat for about 5-8 minutes, allowing the cheese to melt and the crust to become crispy.
For those in a hurry, the microwave is an option, but it can lead to a soggy crust. To combat this, place a cup of water in the microwave alongside your pizza slice. Heat on medium power for about 30-60 seconds. This technique adds moisture and helps prevent the crust from becoming too chewy.
If you have an air fryer, it’s another fantastic way to reheat your pizza. Set the air fryer to 350°F (175°C) and heat for about 3-5 minutes. This method ensures a crispy crust and melty cheese, making your pizza taste freshly baked!
In summary, with these storage and reheating tips, your Homemade Classic Pizza will remain a delightful treat, even days after it’s made. Enjoy every bite, and happy pizza eating!
Conclusion
In conclusion, making Homemade Classic Pizza with an easy 6-ingredient dough is not only a delightful culinary adventure but also a fantastic way to bring family and friends together. This recipe stands out because of its simplicity and versatility, allowing you to customize it to suit your tastes and dietary needs. Whether you prefer a classic Margherita or a loaded veggie delight, the possibilities are endless. So, gather your loved ones, roll up your sleeves, and enjoy the process of creating your own pizza masterpiece. Remember, cooking is all about having fun and expressing your creativity!
Share Your Experience
I invite you to share your results or ask any questions you may have. Did you try a unique topping combination? Or perhaps you discovered a new favorite sauce? Your feedback is invaluable! Additionally, don’t hesitate to experiment with variations or pairings to make this Homemade Classic Pizza truly your own. After all, the kitchen is a playground for culinary creativity, and this recipe is an excellent choice for anyone looking to explore new flavors and techniques.
So, what are you waiting for? Dive into the world of homemade goodness and make pizza night a cherished family tradition. Enjoy every bite and the joy of cooking!
FAQs about Homemade Classic Pizza
Here are some common questions about making Homemade Classic Pizza, along with helpful answers to enhance your pizza-making experience.
1. Can I use store-bought dough for my Homemade Classic Pizza?
Absolutely! While making your own dough is rewarding, store-bought options can save time. Just roll it out and follow the same assembly instructions for a delicious pizza.
2. What toppings work best for Homemade Classic Pizza?
When it comes to toppings, the sky’s the limit! Classic choices include mozzarella cheese, pepperoni, bell peppers, and fresh basil. However, feel free to get creative with vegetables or even grilled chicken for a personal touch.
3. How do I prevent my pizza from getting soggy?
To avoid a soggy crust, ensure your oven is preheated to a high temperature, ideally around 475°F (245°C). Additionally, use a pizza stone if you have one, as it helps absorb moisture and gives you a crispier base.
4. Can I make the dough ahead of time?
Yes, you can prepare the dough in advance! Simply make it, let it rise, and then refrigerate it. Just remember to bring it back to room temperature before rolling it out for your Homemade Classic Pizza.
5. What is the best way to store leftover pizza?
To keep your leftover Homemade Classic Pizza fresh, store it in an airtight container in the refrigerator. For best results, reheat it in the oven to maintain its crispiness, rather than using a microwave.