

Have you ever wondered how a simple dish can transform into an indulgent dessert? Chocolate crepes with whipped cream are not only easy to make but also incredibly versatile. Whether you’re looking for a delightful breakfast alternative or a stunning dessert for special occasions, these crepes are sure to impress. Additionally, they can be customized to suit various dietary preferences, making them a family-friendly favorite. So, let’s dive into this delicious recipe that will surely satisfy your sweet cravings!
Table of Contents

Chocolate Crepes with Whipped Cream
Equipment
- 1 Non-stick skillet For cooking the crepes.
- 1 Mixing bowl For combining the batter.
- 1 Whisk For mixing the batter.
- 1 spatula For flipping the crepes.
- 1 Electric mixer For whipping the cream.
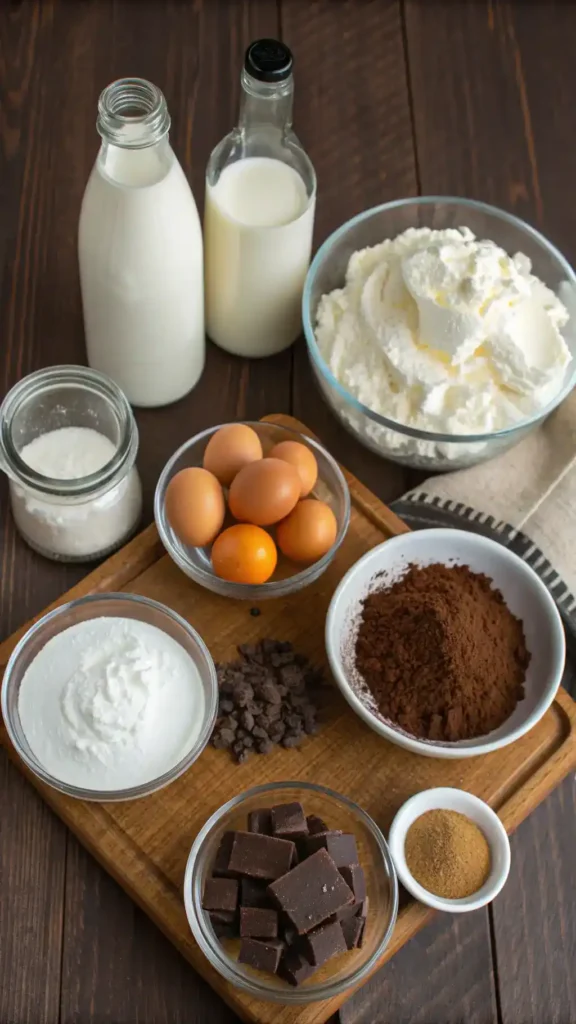
Ingredients
Crepe Batter
- 1 cup All-Purpose Flour Forms the base of the crepes.
- 2 tablespoons Unsweetened Cocoa Powder Adds chocolate flavor.
- 2 large Eggs Essential for binding.
- 1.5 cups Milk (or Dairy-Free Alternative) Brings moisture and creaminess.
- 2 tablespoons Granulated Sugar Balances the bitterness of cocoa.
- 1 teaspoon Vanilla Extract Adds warmth and depth.
Whipped Cream
- 1 cup Heavy Cream For making whipped cream.
- 2 tablespoons Sweetener of Choice To sweeten the whipped cream.
Instructions
Prepare the Batter
- In a mixing bowl, whisk together 1 cup of all-purpose flour, 2 tablespoons of unsweetened cocoa powder, 2 large eggs, 1 1/2 cups of milk (or a dairy-free alternative), 2 tablespoons of granulated sugar, and 1 teaspoon of vanilla extract until the batter is smooth. Make sure there are no lumps for the best texture.
Cook the Crepes
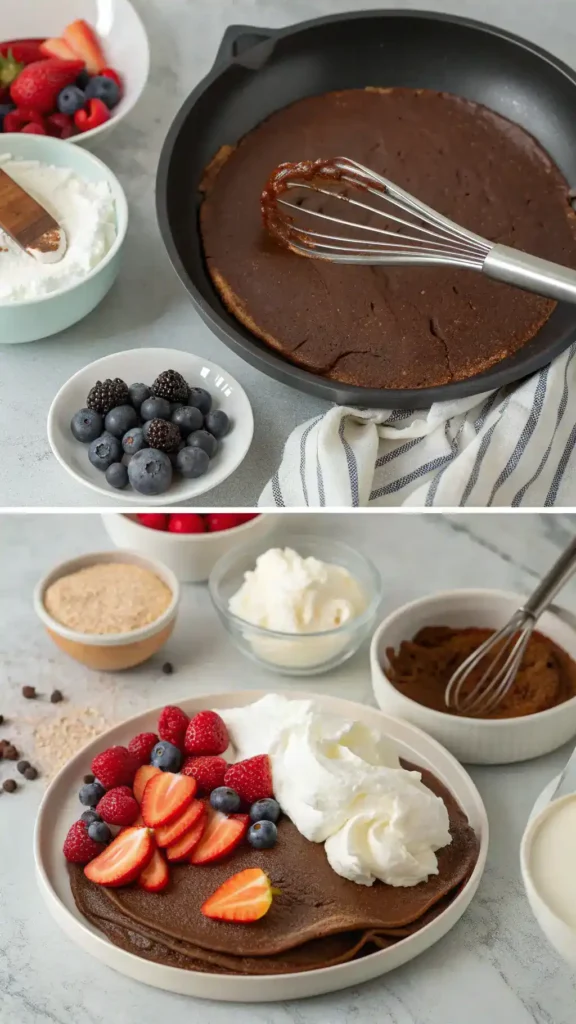
- Next, heat a non-stick skillet over medium heat. Lightly grease it with butter or oil to prevent sticking. Once hot, pour in a small amount of batter, swirling it to coat the bottom evenly. This should be about 1/4 cup of batter. Cook the crepe for about 1-2 minutes until the edges start to lift and the surface appears set. Then, carefully flip it using a spatula and cook for another minute on the other side. Repeat this process with the remaining batter, stacking the cooked crepes on a plate. Keep them warm by covering them with a clean kitchen towel.
Make the Whipped Cream
- For the whipped cream, in a separate bowl, beat 1 cup of heavy cream with 2 tablespoons of sweetener (like powdered sugar or maple syrup) until soft peaks form. This should take just a few minutes.
Serve
- Finally, serve the warm chocolate crepes topped with a generous dollop of whipped cream. You can also add fresh berries or a drizzle of chocolate sauce for an extra touch.
Video
Notes
Key Benefits:
Chocolate crepes with whipped cream are not just a delicious indulgence; they also offer several noteworthy benefits. Here’s why you should consider making this delightful treat:
- Versatile Treat: Chocolate crepes can be enjoyed at any time of day. Whether for breakfast, dessert, or a special occasion, they fit the bill perfectly.
- Customizable: You can easily adapt chocolate crepes to meet various dietary preferences. For instance, using gluten-free flour allows those with gluten sensitivities to enjoy them too.
- Rich in Antioxidants: Dark chocolate, often used in these crepes, is rich in flavonoids. These antioxidants can help reduce inflammation and improve heart health.
- Quick and Easy: The recipe is straightforward, making it an excellent choice for busy mornings or last-minute gatherings. In just a few steps, you can whip up a delightful dish.
- Family-Friendly: Kids and adults alike love chocolate crepes. They can be a fun way to get the family involved in cooking, allowing everyone to customize their toppings.
In summary, chocolate crepes with whipped cream are not only a delightful treat but also a versatile and health-conscious option that can be enjoyed by everyone. So, why not gather your ingredients and create this culinary delight today?
Ingredients
To create the most delightful Chocolate Crepes with Whipped Cream, you will need the following ingredients:
- All-Purpose Flour: This forms the base of your crepes, providing a light and tender texture. The flour acts as a canvas, ready to absorb the rich flavors of chocolate.
- Unsweetened Cocoa Powder: The star of the show! This adds a deep, chocolatey flavor that makes each bite a heavenly experience. Its rich aroma will fill your kitchen as you mix it into the batter.
- Milk (or Dairy-Free Alternative): Whether you choose whole milk or almond milk, this ingredient brings moisture and creaminess to your crepes. It helps create a silky batter that cooks to perfection.
- Eggs: These are essential for binding the ingredients together. They contribute to the structure and richness of the crepes, ensuring they are both pliable and flavorful.
- Granulated Sugar: A touch of sweetness balances the bitterness of the cocoa powder. It enhances the overall flavor, making your crepes irresistible.
- Vanilla Extract: Just a splash of this fragrant extract elevates the taste, adding warmth and depth to your crepes.
- Heavy Cream: For the whipped cream, this ingredient is crucial. It whips up beautifully, creating a light and airy topping that complements the chocolate perfectly.
- Sweetener of Choice: Whether you prefer granulated sugar, maple syrup, or a sugar substitute, this will sweeten your whipped cream to your liking.
Gather these ingredients, and you are well on your way to crafting a delicious treat that will delight chocolate lovers and dessert enthusiasts alike. Each component plays a vital role, ensuring that your Chocolate Crepes with Whipped Cream are not only easy to make but also a culinary delight!
How to Make Chocolate Crepes with Whipped Cream
Making chocolate crepes with whipped cream is a delightful experience that anyone can enjoy. Follow these simple steps to create this indulgent dessert that’s perfect for any occasion.
- In a mixing bowl, whisk together 1 cup of all-purpose flour, 2 tablespoons of unsweetened cocoa powder, 2 large eggs, 1 1/2 cups of milk (or a dairy-free alternative), 2 tablespoons of granulated sugar, and 1 teaspoon of vanilla extract until the batter is smooth. Make sure there are no lumps for the best texture.
- Next, heat a non-stick skillet over medium heat. Lightly grease it with butter or oil to prevent sticking. Once hot, pour in a small amount of batter, swirling it to coat the bottom evenly. This should be about 1/4 cup of batter.
- Cook the crepe for about 1-2 minutes until the edges start to lift and the surface appears set. Then, carefully flip it using a spatula and cook for another minute on the other side.
- Repeat this process with the remaining batter, stacking the cooked crepes on a plate. Keep them warm by covering them with a clean kitchen towel.
- For the whipped cream, in a separate bowl, beat 1 cup of heavy cream with 2 tablespoons of sweetener (like powdered sugar or maple syrup) until soft peaks form. This should take just a few minutes.
- Finally, serve the warm chocolate crepes topped with a generous dollop of whipped cream. You can also add fresh berries or a drizzle of chocolate sauce for an extra touch.
Enjoy your homemade chocolate crepes with whipped cream, a treat that’s sure to impress family and friends alike!
Pro Tips, Variations, and Common Problems
Making the perfect Chocolate Crepes with Whipped Cream can be a delightful experience, but it’s essential to keep a few expert tips in mind. Here’s how to ensure your crepes turn out beautifully every time:
- Check Your Batter Consistency: The batter should be smooth and lump-free. If it’s too thick, add a little more milk. Conversely, if it’s too runny, a touch more flour will help.
- Use the Right Pan: A non-stick skillet is ideal for cooking crepes. Ensure it’s well-heated and lightly greased before pouring in the batter.
- Experiment with Flours: If you’re looking for a gluten-free option, try using a gluten-free flour blend. This can yield equally delicious results.
- Flavor Variations: For a twist, consider adding a teaspoon of espresso powder to the batter for a mocha flavor or a splash of orange zest for a citrusy note.
- Creative Fillings: While whipped cream is a classic topping, feel free to add fresh fruits like strawberries or bananas, or even a drizzle of chocolate sauce for extra indulgence.
- Common Problems: If your crepes are tearing, it may be due to the skillet being too hot or not greased enough. Adjust the heat and ensure a light coating of oil or butter before each crepe.
- Storage Tips: If you have leftovers, store them in an airtight container in the fridge for up to three days. Reheat gently in a skillet or microwave.
By following these tips, you’ll not only enhance your Chocolate Crepes with Whipped Cream but also troubleshoot any issues that may arise. Enjoy the process, and happy cooking!
Serving Suggestions
When it comes to serving your Chocolate Crepes with Whipped Cream, presentation is key. A beautifully plated dish not only enhances the dining experience but also impresses your guests. Here are some delightful serving ideas:
- Layered Elegance: Stack two or three crepes on a plate, slightly offsetting each layer. This creates a visually appealing tower that invites indulgence.
- Whipped Cream Delight: Generously dollop whipped cream on top of the crepes. For an extra touch, pipe the cream using a pastry bag for a professional look.
- Fresh Fruit Accents: Add a burst of color with fresh berries or banana slices. Scatter them around the plate or atop the whipped cream for a vibrant contrast.
- Chocolate Drizzle: Drizzle warm chocolate sauce over the crepes and whipped cream. This not only adds flavor but also creates a mouthwatering visual effect.
- Nutty Crunch: Sprinkle chopped nuts, such as almonds or hazelnuts, over the top for added texture and a nutty flavor that complements the chocolate.
- Minty Freshness: Garnish with a sprig of fresh mint. This adds a pop of color and a refreshing aroma that enhances the overall experience.
- Serving Style: Consider serving the crepes on a rustic wooden board for a casual brunch or on elegant china for a more formal dessert presentation.
Additionally, you can serve these chocolate crepes as a delightful breakfast alternative. Pair them with a side of maple syrup or honey for a sweet morning treat. Overall, the versatility of Chocolate Crepes with Whipped Cream allows you to get creative, ensuring that every serving is a feast for the eyes as well as the palate.
Preserving and Reheating Chocolate Crepes with Whipped Cream
To keep your chocolate crepes with whipped cream fresh and delicious, proper storage is essential. First, allow the crepes to cool completely before storing them. Then, stack the crepes with a layer of parchment paper between each one to prevent sticking. Place them in an airtight container and store them in the refrigerator for up to 3 days. If you want to keep them longer, consider freezing them. Wrap each crepe tightly in plastic wrap and then place them in a freezer-safe bag or container. In the freezer, they can last for up to 2 months. When storing whipped cream, it’s best to keep it separate. Store it in a clean, airtight container in the refrigerator, where it will stay fresh for about 2 days. Always check for any signs of spoilage, such as an off smell or discoloration, to ensure food safety.
Reheating Methods
When it comes to reheating your chocolate crepes with whipped cream, the goal is to maintain their delightful texture and flavor. One of the best methods is to use a skillet. Start by preheating your skillet over low heat. Then, place a crepe in the skillet and cover it with a lid. Heat for about 30 seconds to 1 minute, flipping halfway through. This method helps to keep the crepe moist. Alternatively, you can use the microwave. Place a crepe on a microwave-safe plate and cover it with a damp paper towel. Heat in 10-15 second intervals until warmed through, being careful not to overcook. If you prefer using an air fryer, set it to a low temperature (around 300°F) and heat for about 2-3 minutes. Regardless of the method, adding a bit of moisture, like a sprinkle of water or a light spray of cooking oil, can help refresh the crepes and prevent them from drying out. Enjoy your reheated chocolate crepes topped with freshly whipped cream for a delightful treat!
Conclusion
In conclusion, chocolate crepes with whipped cream are not only a delightful treat but also an easy recipe that anyone can master. Their versatility makes them perfect for breakfast, dessert, or any special occasion. So, why not gather your ingredients and give this recipe a try? You’ll find that the process is as enjoyable as the delicious results. Remember, cooking is all about creativity and fun, so feel free to experiment with different fillings or toppings to make these crepes your own. I encourage you to share your results or ask any questions you might have; I’m here to help! Whether you choose to add fresh fruit, a drizzle of chocolate sauce, or even a sprinkle of nuts, the possibilities are endless. So, roll up your sleeves and dive into the world of chocolate crepes with whipped cream—you won’t regret it!
FAQs
Here are some common questions about making Chocolate Crepes with Whipped Cream, along with helpful answers to enhance your cooking experience.
Can I make these crepes gluten-free?
Yes, you can easily make gluten-free chocolate crepes! Simply substitute all-purpose flour with a gluten-free flour blend. This way, you can enjoy the same delicious taste without the gluten.
How should I store leftover crepes?
To store leftover chocolate crepes, place them in an airtight container and keep them in the refrigerator for up to 3 days. This will help maintain their freshness and flavor.
What can I use instead of heavy cream for the whipped cream?
If you’re looking for a lighter option, you can use coconut cream or a dairy-free whipped topping. Both alternatives will still give you that delightful creaminess.
Can I add fillings to the crepes?
Absolutely! You can fill your chocolate crepes with various ingredients such as fresh fruits, Nutella, or even a flavored cream cheese. This adds an exciting twist to your dessert!
What should I do if my crepes are tearing?
If your crepes are tearing, it might be due to the batter being too thick or the skillet not being hot enough. Ensure your batter is smooth and thin, and preheat your skillet adequately before pouring in the batter.