
As the vibrant colors of spring emerge, families gather to celebrate Easter with joy and delicious treats. One of my fondest memories is making a delightful Easter Jell O Pie with my loved ones. This no-bake dessert not only brings a festive flair to the table but also offers a light and refreshing taste that everyone enjoys. Moreover, it’s incredibly easy to prepare, making it a perfect choice for busy families. With its colorful presentation and creamy texture, this Easter Jell O Pie is sure to become a favorite at your holiday gatherings. So, let’s dive into this delightful recipe that combines simplicity with festive charm!
Table of Contents
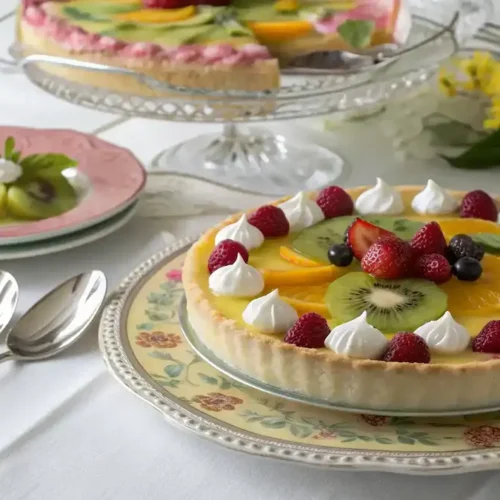
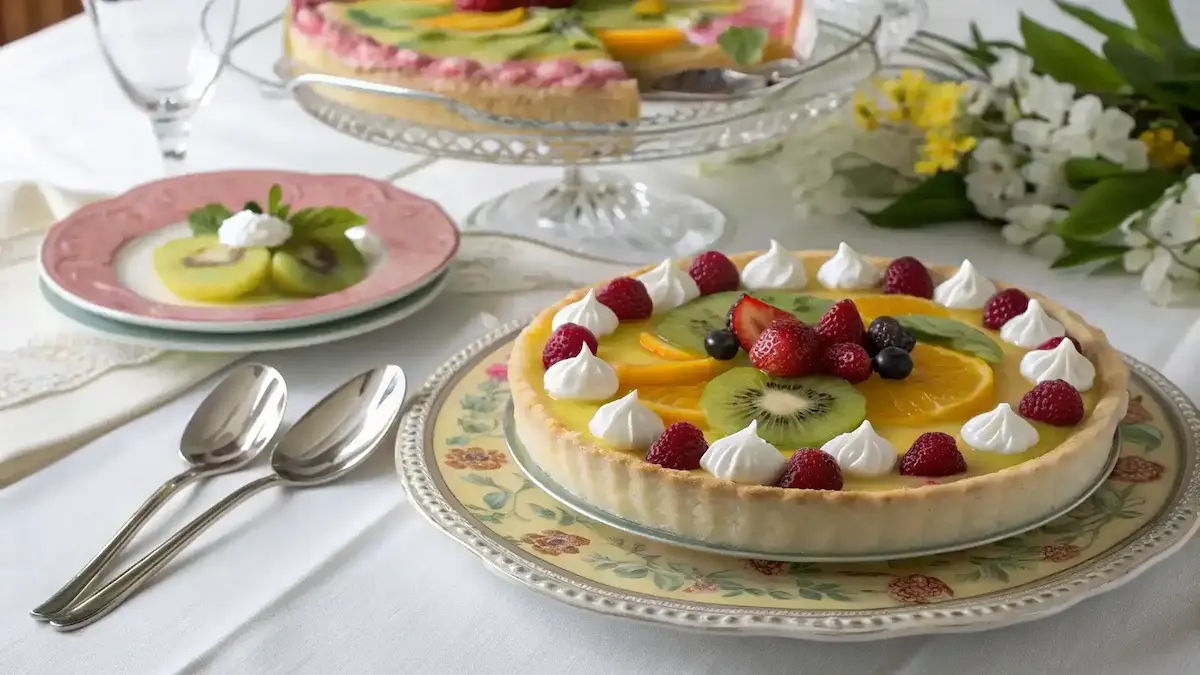
Easter Jell O Pie
Equipment
- 1 Saucepan For boiling water
- 1 Mixing bowl For mixing cream cheese
- 1 Hand mixer For mixing cream cheese
- 1 measuring cups For measuring ingredients
- 1 Plastic Wrap For covering the pie while chilling
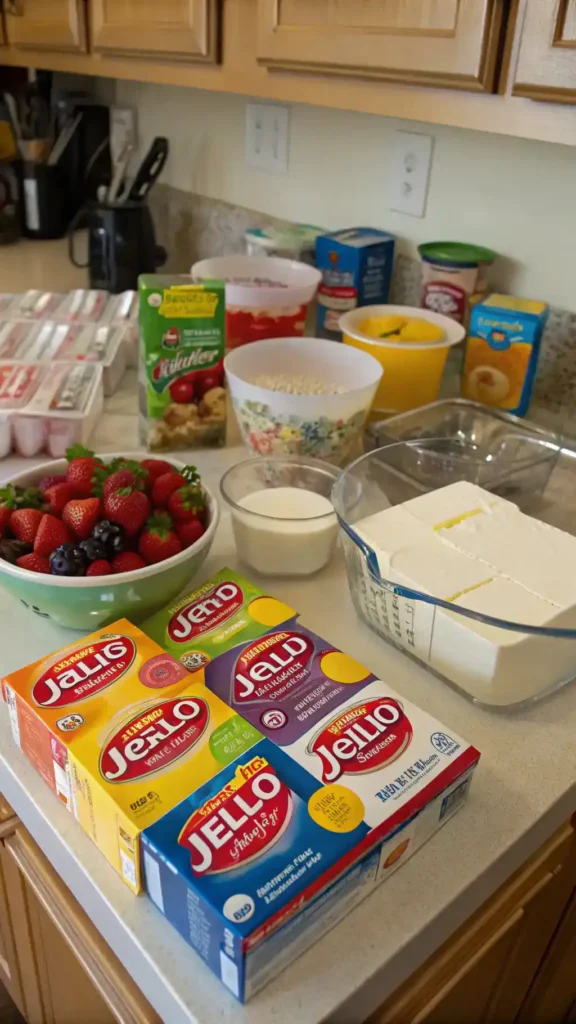
Ingredients
Gelatin Mixture
- 1 package flavored gelatin Your choice of color and flavor
- 1 cup boiling water For dissolving gelatin
Cream Cheese Mixture
- 8 oz cream cheese Softened
- 1 cup whipped cream or whipped topping For folding into the mixture
- 1/2 cup sugar or sugar substitute To taste
Crust
- 1 pre-made graham cracker or cookie crust For the pie base
- to taste servings fresh fruit toppings Such as strawberries, blueberries, or kiwi
Instructions
Prepare the Gelatin
- Start by boiling 1 cup of water in a saucepan. Once boiling, add your chosen flavored gelatin and stir until fully dissolved.
Add Cold Water
- After the gelatin is dissolved, add 1 cup of cold water to the mixture. Stir well and set it aside to cool slightly.
Mix the Cream Cheese
- In a separate bowl, take 8 ounces of softened cream cheese. Using a hand mixer, beat it until smooth and creamy.
Combine Ingredients
- Gradually pour the cooled gelatin mixture into the cream cheese while mixing. Ensure it’s well combined.
Fold in Whipped Cream
- Gently fold in 8 ounces of whipped topping into the mixture. Be careful not to deflate the whipped cream.
Layer into the Crust
- Pour the mixture into a pre-prepared graham cracker or cookie crust. Spread it evenly.
Chill the Pie
- Cover the pie with plastic wrap and place it in the refrigerator. Allow it to chill for at least 4 hours, or until it’s set.
Garnish and Serve
- Once set, remove the pie from the fridge. Garnish with fresh fruit or additional whipped cream.
Video
Notes
Key Benefits
The Easter Jell O Pie is not just a dessert; it’s a celebration on a plate! This festive dessert brings joy and color to your Easter gatherings, making it a delightful centerpiece. Here are some key benefits that make this no-bake treat a must-try:
- Easy to Prepare: With minimal ingredients and no baking required, you can whip up this pie in no time. It’s perfect for those busy days leading up to Easter.
- Family-Friendly: Kids and adults alike will love the vibrant colors and sweet flavors of the Easter Jell O Pie. It’s a dessert that brings everyone together!
- Light and Refreshing: This pie is a great way to enjoy a sweet treat without feeling weighed down. Its light texture makes it a refreshing option after a hearty Easter meal.
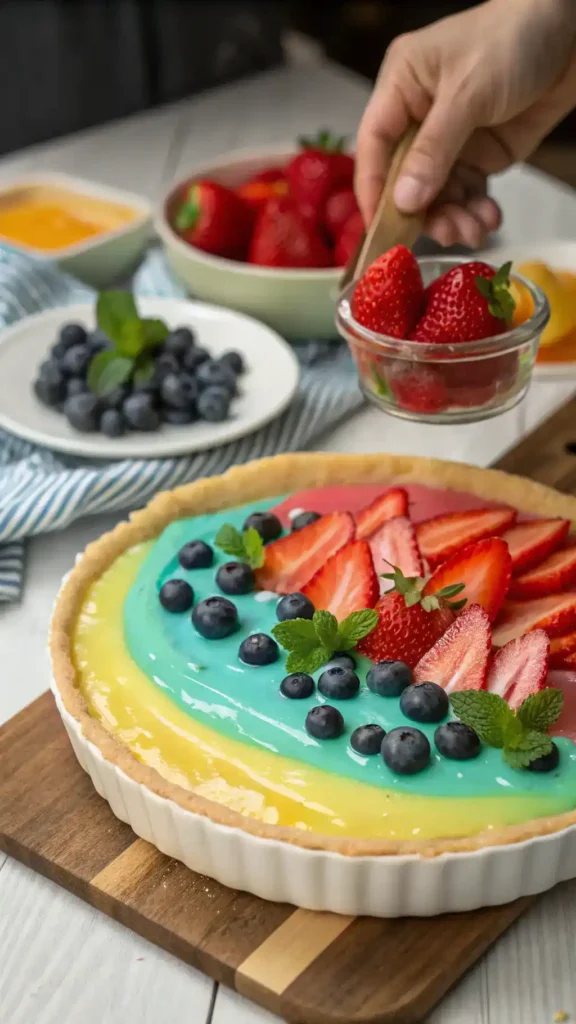
- Colorful Presentation: The beautiful layers of Jell-O create a stunning visual appeal. This colorful presentation will surely impress your guests and add a festive touch to your table.
- Customizable: You can easily adapt the flavors and toppings to suit your preferences. Whether you prefer strawberry, lime, or blue raspberry, the possibilities are endless!
In summary, the Easter Jell O Pie is a delightful dessert that combines ease of preparation with festive charm. So, gather your loved ones and enjoy this light and sweet treat that’s sure to bring smiles all around!
Ingredients
To create the perfect Easter Jell O Pie, you will need a handful of simple ingredients that come together beautifully. Here’s what you’ll need:
- 1 package of flavored gelatin (your choice of color and flavor)
- 1 cup of boiling water
- 8 oz cream cheese, softened
- 1 cup whipped cream or whipped topping
- 1/2 cup sugar or a sugar substitute
- 1 pre-made graham cracker or cookie crust
- Fresh fruit toppings (such as strawberries, blueberries, or kiwi)
These ingredients not only make the Easter Jell O Pie easy to prepare but also ensure a colorful presentation. Moreover, feel free to substitute the sugar with a sweetener of your choice to cater to dietary preferences. Additionally, fresh fruits can add a delightful twist, enhancing both flavor and visual appeal. So, gather your ingredients and get ready to create a festive dessert that everyone will love!
How to Make Easter Jell O Pie
Making your Easter Jell O Pie is a delightful and straightforward process. Follow these steps to create a colorful and festive dessert that will impress your family and friends.
- Prepare the Gelatin: Start by boiling 1 cup of water in a saucepan. Once boiling, add your chosen flavored gelatin (like strawberry or lime) and stir until fully dissolved. This step is crucial, as it ensures a smooth texture in your pie.
- Add Cold Water: After the gelatin is dissolved, add 1 cup of cold water to the mixture. Stir well and set it aside to cool slightly. This cooling period is important for the next steps.
- Mix the Cream Cheese: In a separate bowl, take 8 ounces of softened cream cheese. Using a hand mixer, beat it until smooth and creamy. This will create a rich base for your pie.
- Combine Ingredients: Gradually pour the cooled gelatin mixture into the cream cheese while mixing. Ensure it’s well combined. This step is essential for achieving that creamy consistency.
- Fold in Whipped Cream: Gently fold in 8 ounces of whipped topping into the mixture. Be careful not to deflate the whipped cream; this will keep your pie light and airy.
- Layer into the Crust: Pour the mixture into a pre-prepared graham cracker or cookie crust. Spread it evenly, ensuring a smooth surface. This is where the pie begins to take shape!
- Chill the Pie: Cover the pie with plastic wrap and place it in the refrigerator. Allow it to chill for at least 4 hours, or until it’s set. This chilling time is vital for the flavors to meld beautifully.
- Garnish and Serve: Once set, remove the pie from the fridge. Garnish with fresh fruit or additional whipped cream for a festive touch. This final step adds a pop of color and flavor, making your Easter Jell O Pie truly special.
And there you have it! Your Easter Jell O Pie is ready to be enjoyed. This no-bake treat is not only easy to prepare but also a delightful addition to your Easter celebrations.
Pro Tips, Variations & Common Problems
Creating the perfect Easter Jell O Pie can be a delightful experience, but there are a few tips to ensure it turns out just right. Firstly, always remember to soften your cream cheese before mixing. This step is crucial because it helps avoid those pesky lumps in your filling. Additionally, if you’re looking to elevate the flavor, consider using different Jell-O flavors or even adding a fruit puree. For instance, strawberry or raspberry puree can add a delightful twist.
Moreover, if you encounter a runny texture, don’t worry! This is a common issue that can often be resolved by allowing the pie to chill longer. Ensure that your gelatin is fully dissolved before mixing it with other ingredients. If you find that your pie isn’t setting properly, it may be due to not using enough gelatin or not chilling it long enough. Therefore, be patient and give it the time it needs to firm up.
For those who want to make this dessert even more versatile, consider these variations: you can swap out the graham cracker crust for a cookie crust or even a gluten-free option. Furthermore, adding layers of fresh fruit between the Jell-O layers can create a stunning visual effect and enhance the flavor. If you’re looking for a lighter option, using sugar-free Jell-O and whipped topping is a great alternative.
Lastly, a common mistake is not allowing the pie to set completely before serving. To avoid this, plan ahead and give your Easter Jell O Pie at least four hours in the refrigerator. This way, you’ll ensure a beautifully firm and sliceable dessert that will impress your guests. Remember, the key to a successful Easter Jell O Pie lies in the details, so take your time and enjoy the process!
Serving Suggestions
When it comes to serving your Easter Jell O Pie, presentation is key. To elevate this delightful dessert, consider these engaging serving suggestions that will impress your guests and enhance the festive atmosphere.
Firstly, garnish each slice with a dollop of whipped cream. This adds a creamy texture that beautifully complements the pie’s fruity flavors. Additionally, sprinkle some colorful fruit on top, such as fresh strawberries, blueberries, or kiwi slices. Not only does this enhance the visual appeal, but it also provides a refreshing burst of flavor.
Moreover, consider serving your Easter Jell O Pie alongside a selection of beverages. Here are some delightful pairings:
- Refreshing Lemonade: A chilled glass of homemade lemonade offers a zesty contrast to the sweetness of the pie.
- Herbal Iced Tea: Opt for a lightly sweetened herbal iced tea, which adds a soothing element to your dessert spread.
- Fruit-Infused Sparkling Water: For a bubbly touch, serve sparkling water infused with slices of citrus or berries. This adds a festive flair while keeping things light.
Furthermore, if you’re hosting a larger gathering, consider creating a dessert table. Place your Easter Jell O Pie at the center, surrounded by other colorful treats like fruit skewers, mini cupcakes, or a vibrant fruit salad. This not only creates an inviting display but also encourages guests to indulge in a variety of flavors.
Lastly, don’t forget to serve the pie chilled. This ensures that every bite is refreshing, especially during the warmer spring weather. By following these serving suggestions, your Easter Jell O Pie will not only taste delightful but also look stunning on your dessert table, making it a memorable centerpiece for your celebration.
Preserving and Reheating Your Easter Jell O Pie
To keep your Easter Jell-O Pie fresh and delicious, proper storage is essential. First, always store your pie in the refrigerator. Cover it tightly with plastic wrap or place it in an airtight container. This helps prevent it from absorbing any unwanted odors and keeps it moist. Ideally, enjoy your pie within 3-5 days for the best flavor and texture. If you need to store it longer, consider freezing it. Wrap the pie securely in plastic wrap and then in aluminum foil to prevent freezer burn. In the freezer, it can last up to 2 months. However, be aware that freezing may slightly alter the texture, so it’s best to consume it fresh whenever possible. Additionally, always practice food safety by ensuring your pie is kept at a consistent temperature and not left out at room temperature for more than two hours.
Reheating Methods
Interestingly, Easter Jell-O Pie is best served cold, so reheating is typically unnecessary. However, if you find yourself needing to refresh it, here are some gentle methods to consider. Firstly, if the pie has been frozen, allow it to thaw in the refrigerator overnight. This gradual thawing helps maintain its texture. If you want to serve it slightly warmer, you can place individual slices on a microwave-safe plate. Heat them in the microwave for about 10-15 seconds. Be cautious not to overheat, as this can cause the pie to lose its delightful creaminess.
Alternatively, if you prefer a more traditional approach, you can use the oven. Preheat it to a low temperature, around 200°F (93°C). Place the pie on a baking sheet and warm it for about 10-15 minutes. This method helps to evenly warm the pie without drying it out. If you notice the crust becoming too dry, consider adding a light drizzle of fruit juice or a dollop of whipped cream before serving. This will enhance the moisture and flavor, making your Easter Jell-O Pie a delightful treat once again.
Conclusion
In conclusion, the Easter Jell-O Pie is a delightful dessert that combines ease of preparation with festive charm. Its vibrant colors and refreshing taste make it a family favorite during Easter celebrations, ensuring smiles all around. Moreover, this no-bake treat is not only simple to make but also incredibly versatile. You can easily customize it with your favorite flavors and toppings, making it a perfect choice for any gathering.
So, gather your ingredients and give this recipe a try! I encourage you to experiment with different Jell-O flavors or add fresh fruits for a personal touch. Cooking is all about creativity, and the Easter Jell-O Pie is an excellent canvas for your culinary imagination. If you have any questions or want to share your results, please feel free to reach out. I would love to hear about your experiences and any unique variations you come up with!
Happy cooking, and may your Easter celebrations be filled with joy and delicious treats!
FAQs about Easter Jell-O Pie
Here are some common questions you might have about making and enjoying your Easter Jell-O Pie. We hope these answers help you create the perfect dessert!
Can I use sugar-free Jell-O?
Yes, you can definitely use sugar-free Jell-O! It works just as well and is a great option for a lighter dessert.
How long can I store the pie?
For the best taste and texture, it’s best to consume your Easter Jell-O Pie within 3-5 days. Make sure to store it properly in the refrigerator!
Can I use different fruits?
Absolutely! You can use a variety of fruits like strawberries, blueberries, or even kiwi. This not only adds flavor but also enhances the colorful presentation.
What if my pie is too runny?
If your pie turns out runny, it might need more chilling time. Ensure that the gelatin is fully dissolved before mixing it with the other ingredients. If needed, let it chill longer in the fridge.
Can I make this pie ahead of time?
Yes, making the Easter Jell-O Pie ahead of time is a great idea! Just prepare it a day or two in advance and store it in the fridge until you’re ready to serve.