
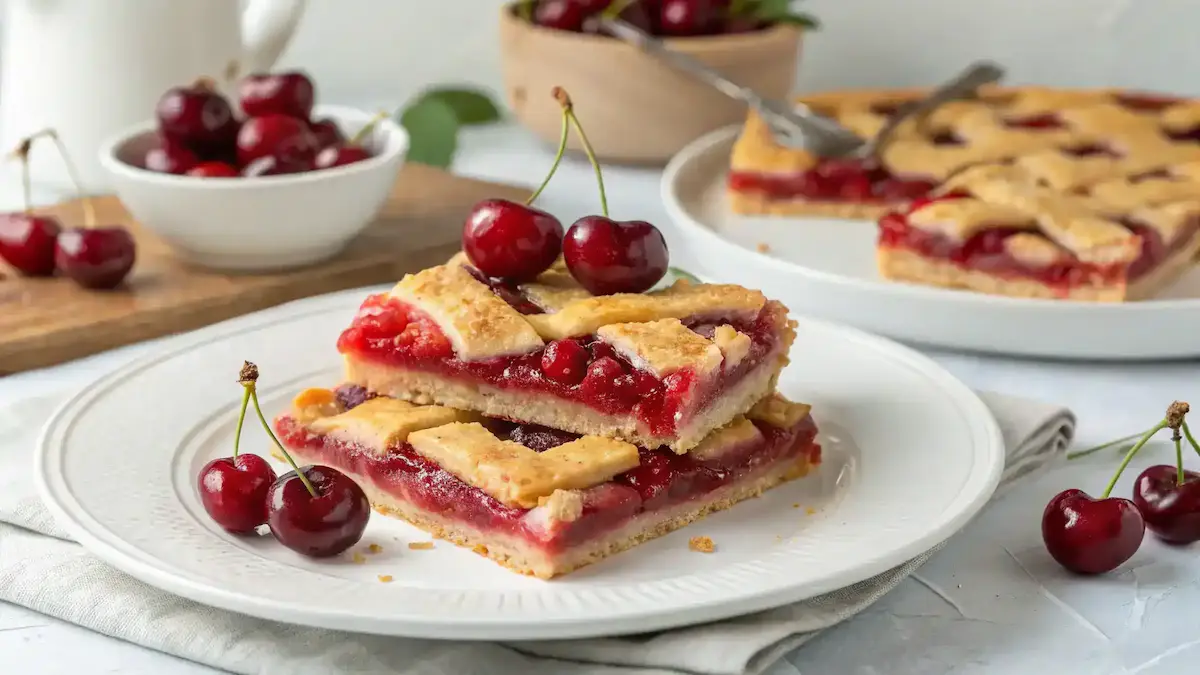
Did you know that you can enjoy the classic flavors of cherry pie in a more convenient form? Cherry Pie Bars are not only an easy dessert but also a portable treat that everyone will love. They capture the essence of a traditional cherry pie while being perfect for gatherings and family-friendly occasions. Furthermore, these fruit-filled desserts are a fantastic way to incorporate seasonal flavors into your diet. So, whether you’re planning a picnic or simply craving something sweet, these Cherry Pie Bars will surely satisfy your taste buds!
Table of Contents

Cherry Pie Bars
Equipment
- 1 9×13-inch baking dish Line with parchment paper for easy removal.
- 1 Mixing bowls For combining wet and dry ingredients.
Ingredients
Filling
- 2 cups Fresh Cherries Pitted and sliced, or use cherry filling.
- 1 cup Granulated Sugar Adjust for sweetness preference.
Crust
- 2 cups All-Purpose Flour Forms the base of the crust.
- 1 cup Oats Rolled oats add chewiness.
- 1 cup Butter Softened for easy mixing.
- 1 teaspoon Almond Extract Enhances cherry flavor.
- 1 teaspoon Baking Powder For leavening.
Instructions
Preparation
- Preheat your oven to 350°F (175°C). Line a 9×13-inch baking dish with parchment paper.
Mixing Ingredients
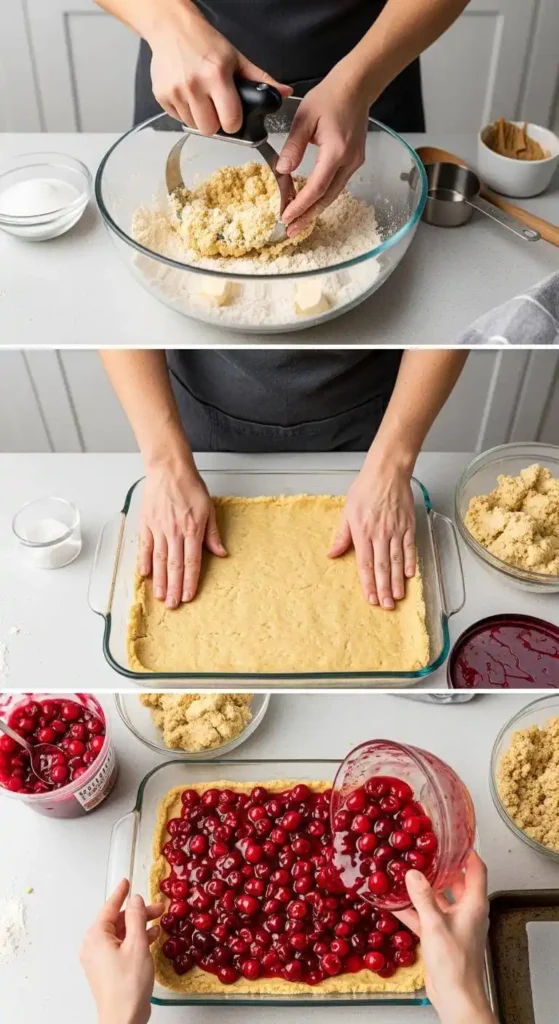
- In a mixing bowl, combine flour, oats, sugar, and baking powder. In another bowl, cream together butter and almond extract. Gradually add dry mixture to wet mixture until crumbly dough forms, reserving 1 cup for topping.
Assembling
- Press remaining dough into the bottom of the baking dish. Spread cherries over the crust and crumble reserved dough on top.
Baking
- Bake for 30-35 minutes until golden brown. Let cool for at least 15 minutes before slicing.
Video
Notes
| Calories | Fat | Protein | Carbs |
|---|---|---|---|
| 200 | 10g | 3g | 28g |
Key Benefits
Cherry Pie Bars are not only a delightful treat but also come with a variety of benefits that make them a fantastic choice for any dessert lover. Here’s why you should consider adding these bars to your baking repertoire:
Easy to Make: Cherry Pie Bars are straightforward to prepare, making them an ideal option for both novice and experienced bakers. With simple ingredients and minimal steps, you can whip up a delicious dessert in no time.
Portable Treat: Unlike traditional pies, these bars are easy to slice and serve, making them perfect for picnics, potlucks, or family gatherings. You can enjoy them on the go without the fuss of a pie dish.
Seasonal Flavors: Using fresh cherries not only enhances the flavor but also allows you to take advantage of seasonal fruits. Cherries are rich in antioxidants, vitamins, and minerals, contributing to a healthier dessert option.
Family-Friendly Recipe: Cherry Pie Bars are a hit with both kids and adults. Their sweet and tart flavor profile appeals to a wide audience, making them a great choice for family gatherings.
Wholesome Ingredients: By using fresh cherries, whole grains, and natural sweeteners, you can create a dessert that is not only tasty but also nutritious. Cherries are known for their anti-inflammatory properties and can aid in recovery after exercise.
In summary, Cherry Pie Bars are a delicious and practical dessert that combines the joy of baking with the health benefits of fresh fruit. So, whether you’re looking for an easy dessert to impress your guests or a portable treat for your next outing, these bars are an excellent choice!
Ingredients
To create the perfect Cherry Pie Bars, you will need the following ingredients:
Fresh Cherries: Juicy and vibrant, fresh cherries are the star of this dessert. Their sweet-tart flavor brings a burst of summer to each bite. If fresh cherries are out of season, you can also use cherry filling for convenience.
All-Purpose Flour: This versatile ingredient forms the base of your crust. It provides structure and a tender crumb, ensuring your bars hold together beautifully.
Granulated Sugar: Sweetness is essential in balancing the tartness of the cherries. You can opt for a sugar substitute if you prefer a lower-calorie option, making these bars even more accessible.
Butter: Rich and creamy, butter adds a luscious flavor and helps create a crumbly texture in the crust. Make sure it’s softened for easy mixing.
Oats: Rolled oats add a delightful chewiness to the crust. They also contribute to a wholesome feel, making these bars a satisfying treat.
Almond Extract: A splash of almond extract enhances the cherry flavor, adding a nutty depth that elevates your Cherry Pie Bars to a new level of deliciousness.

These ingredients blend together to create a sweet, tart filling and a crumbly, buttery crust that everyone will love. As you gather them, imagine the delightful aroma that will fill your kitchen as they bake, creating a warm and inviting atmosphere perfect for family gatherings or a cozy night in.
How to Make Cherry Pie Bars
Making Cherry Pie Bars is a straightforward process that anyone can master. Follow these easy step-by-step instructions to create a delicious fruit-filled dessert that your family will love.
Preheat your oven: Start by preheating your oven to 350°F (175°C). This ensures that your Cherry Pie Bars bake evenly.
Prepare the baking dish: Line a 9×13-inch baking dish with parchment paper. This will make it easier to lift the bars out later.
Mix the dry ingredients: In a mixing bowl, combine 2 cups of all-purpose flour, 1 cup of oats, 1 cup of granulated sugar, and 1 teaspoon of baking powder. Stir these ingredients together until well blended.
Combine the wet ingredients: In another bowl, cream together 1 cup of softened butter and 1 teaspoon of almond extract. Mix until smooth and fluffy.
Combine wet and dry ingredients: Gradually add the dry mixture to the wet mixture. Stir until a crumbly dough forms. Remember to reserve about 1 cup of this dough for the topping.
Spread the dough: Press the remaining dough evenly into the bottom of the prepared baking dish. This will serve as your crust.
Add the cherry filling: If using fresh cherries, pit and slice them. Spread the cherries evenly over the crust. Alternatively, you can use cherry filling for a quicker option.
Crumble the topping: Take the reserved dough and crumble it over the cherry layer. This will create a delightful topping that adds texture.
Bake: Place the baking dish in the preheated oven and bake for 30-35 minutes. Look for a golden brown color on top.
Cool: Once baked, remove the dish from the oven and let it cool in the pan for at least 15 minutes. This cooling period helps the bars set properly.
Slice and serve: After cooling, lift the bars out using the parchment paper. Cut into squares and enjoy your homemade Cherry Pie Bars!
These Cherry Pie Bars are not only easy to make but also perfect for gatherings. They capture the essence of classic cherry pie while being a portable treat that everyone will love. Enjoy the seasonal flavors and share them with your family and friends!
Pro Tips, Variations, and Common Problems
Cherry Pie Bars are a delightful treat, but to ensure they turn out perfectly, here are some expert tips to guide you. Firstly, always use fresh cherries for the best flavor. If fresh cherries are out of season, frozen cherries can work well; just make sure to thaw and drain them thoroughly. Additionally, ensure your butter is softened before mixing, as this helps create a smooth, creamy texture.
If you’re looking for gluten-free options, consider substituting all-purpose flour with a gluten-free blend. This adjustment will keep your Cherry Pie Bars delicious without compromising on texture. Furthermore, if you want to reduce sugar, you can use sugar substitutes like honey or maple syrup, but remember to adjust the liquid content accordingly.
Now, let’s address some common problems you might encounter. A soggy bottom crust is a frequent issue. To avoid this, pre-bake the crust for about 10 minutes before adding the cherry filling. This step helps set the crust and keeps it from becoming too moist. Moreover, if your bars crumble when cutting, allow them to cool completely before slicing. This cooling period helps them firm up, making for cleaner cuts.
For variations, consider mixing in other fruits like blueberries or raspberries for a delightful twist on the classic Cherry Pie Bars. You can also add a sprinkle of cinnamon or nutmeg to the filling for an extra layer of flavor. If you enjoy a nutty crunch, try incorporating chopped nuts into the crust or topping.
Lastly, remember that storage is key to maintaining freshness. Store your Cherry Pie Bars in an airtight container in the refrigerator for up to a week. If you want to keep them longer, freeze them for up to three months. When ready to enjoy, simply reheat in the microwave or oven until warmed through, ensuring that the delicious flavors remain intact.
Serving Suggestions
Cherry Pie Bars are not only delicious but also incredibly versatile when it comes to serving. Here are some delightful ways to present these fruit-filled desserts that will impress your guests:
Classic Pairings: Serve your Cherry Pie Bars warm with a generous scoop of vanilla ice cream. The creamy texture beautifully complements the tart cherry filling, creating a satisfying contrast.
Whipped Cream Delight: Alternatively, top each bar with a dollop of whipped cream. This adds a light, airy touch that enhances the overall experience.
Fresh Garnish: For an extra pop of color, consider garnishing with fresh mint leaves. This not only looks appealing but also adds a refreshing note.
Perfect Beverage Match: Pair your Cherry Pie Bars with a cup of coffee or tea. The warmth of the drink balances the sweetness of the bars, making for a cozy dessert experience.
Picnic Treats: These bars are ideal for picnics or potlucks. Cut them into smaller squares for easy transport and serving. They are a portable treat that everyone will love!
Seasonal Touch: During summer gatherings, serve your Cherry Pie Bars alongside other seasonal fruits. This creates a vibrant dessert table that celebrates the flavors of the season.
In conclusion, whether you choose to serve them simply or with a flourish, Cherry Pie Bars are sure to be a hit. Their easy-to-make nature and delightful taste make them a family-friendly recipe that everyone can enjoy. So, gather your loved ones and indulge in these scrumptious bars!
Preserving and Reheating Cherry Pie Bars
To keep your Cherry Pie Bars fresh and delicious, proper storage is essential. First and foremost, store them in an airtight container. This will help maintain their flavor and texture. If you plan to enjoy them within a week, simply place the container in the refrigerator. However, for longer storage, consider freezing them. Wrapped tightly in plastic wrap and then placed in a freezer-safe bag, they can last up to three months. Remember to label the bag with the date, so you know when to enjoy them. Additionally, always ensure that the bars are completely cooled before storing. This prevents condensation, which can lead to sogginess. For food safety, avoid leaving them out at room temperature for more than two hours to prevent bacterial growth.
Reheating Methods
When it comes to reheating Cherry Pie Bars, you want to preserve their delightful taste and texture. The oven is the best method for this. Preheat your oven to 350°F (175°C). Place the bars on a baking sheet lined with parchment paper. Cover them loosely with aluminum foil to retain moisture. Heat for about 10-15 minutes, checking occasionally to ensure they don’t overcook. Alternatively, if you’re short on time, the microwave works too. Place a bar on a microwave-safe plate and cover it with a damp paper towel. Heat in 15-second intervals until warmed through, being careful not to dry them out. For a crispy finish, consider using an air fryer. Set it to 300°F (150°C) and heat for about 5-7 minutes. This method gives them a delightful crunch while keeping the filling warm. Lastly, if you want to refresh the bars, drizzle a little water or fruit juice over them before reheating. This adds moisture and enhances the flavor, making your Cherry Pie Bars taste freshly baked!
Conclusion
In conclusion, Cherry Pie Bars are not only a simple dessert recipe but also a delightful way to enjoy the vibrant flavors of cherries. They are easy to make, portable, and perfect for any gathering. Therefore, I encourage you to try this family-friendly recipe and experience the joy of baking. As you create these delicious bars, remember that cooking is all about having fun and getting creative. Feel free to share your results or ask any questions you may have; I’d love to hear from you! Additionally, don’t hesitate to experiment with variations or pairings, such as serving them with vanilla ice cream or a dollop of whipped cream. Overall, Cherry Pie Bars are a fantastic choice for anyone looking to indulge in a satisfying dessert while enjoying the process of baking. So, gather your ingredients and let the baking adventure begin!
FAQs about Cherry Pie Bars
Here are some frequently asked questions about Cherry Pie Bars. These questions cover everything from ingredients to storage tips, ensuring you have all the information you need for a delightful baking experience.
Can I use frozen cherries instead of fresh cherries?
Yes, you can use frozen cherries for your Cherry Pie Bars. However, make sure to thaw and drain them first to avoid excess moisture in your filling. This way, your bars will maintain the perfect texture.
How do I store leftover Cherry Pie Bars?
To store your Cherry Pie Bars, place them in an airtight container. They can be kept in the refrigerator for up to a week. If you want to keep them longer, consider freezing them for up to three months.
What can I use as a substitute for almond extract?
If you don’t have almond extract, you can use vanilla extract instead. While it will change the flavor slightly, it will still complement the cherries beautifully in your Cherry Pie Bars.
How can I prevent my Cherry Pie Bars from being soggy?
To avoid a soggy bottom, pre-bake the crust for about 10 minutes before adding the cherry filling. This step helps create a barrier, ensuring your bars have a nice, firm base.
Can I make Cherry Pie Bars gluten-free?
Absolutely! You can substitute all-purpose flour with a gluten-free flour blend. Just ensure that the blend you choose is suitable for baking, and your Cherry Pie Bars will be just as delicious!