
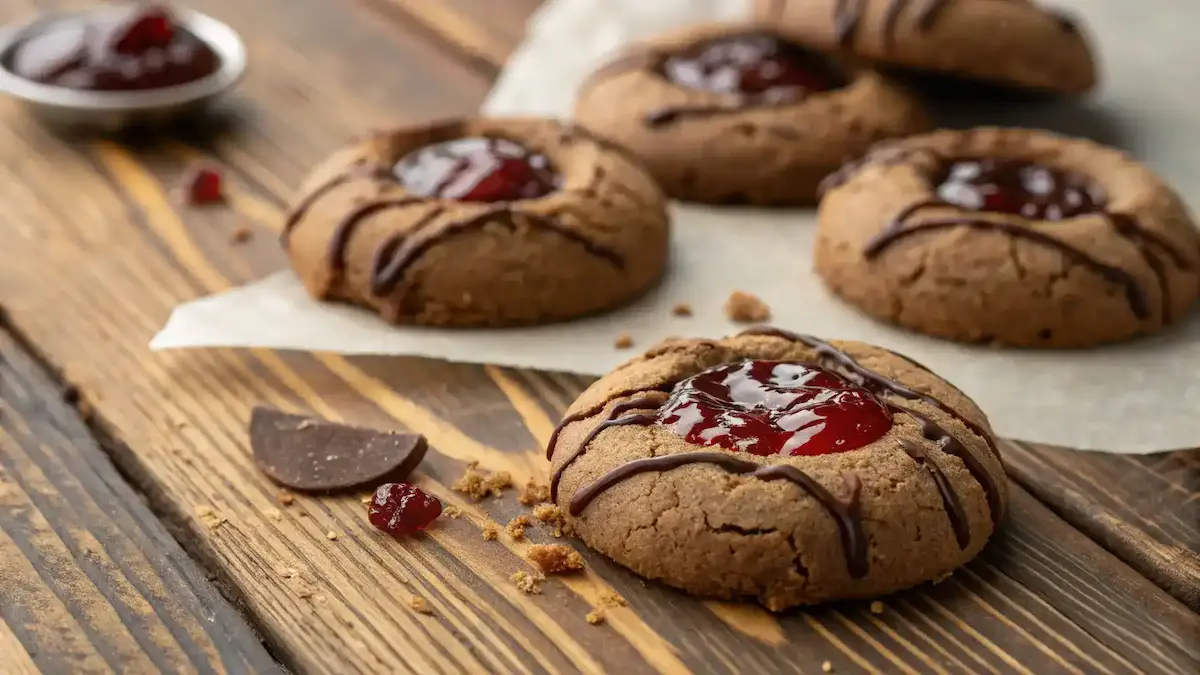
Are you ready to embark on a baking adventure? Chocolate Thumbprint Cookies are not only an indulgent treat but also incredibly easy to make. These delightful cookies are perfect for any occasion, whether you’re hosting a gathering or simply craving something sweet. Moreover, they can be customized with various fillings, making them a versatile dessert that everyone will love. If you’re looking for a gluten-free option, you can easily adapt the recipe to suit your dietary needs. So, let’s dive into the world of Chocolate Thumbprint Cookies and discover how to create these delicious bites that will surely satisfy your sweet tooth!
Table of Contents

Chocolate Thumbprint Cookies
Equipment
- 1 Mixing bowl For mixing dry and wet ingredients.
- 1 Baking sheet For baking the cookies.
- 1 Parchment paper To line the baking sheet.
- 1 wire rack For cooling the cookies.
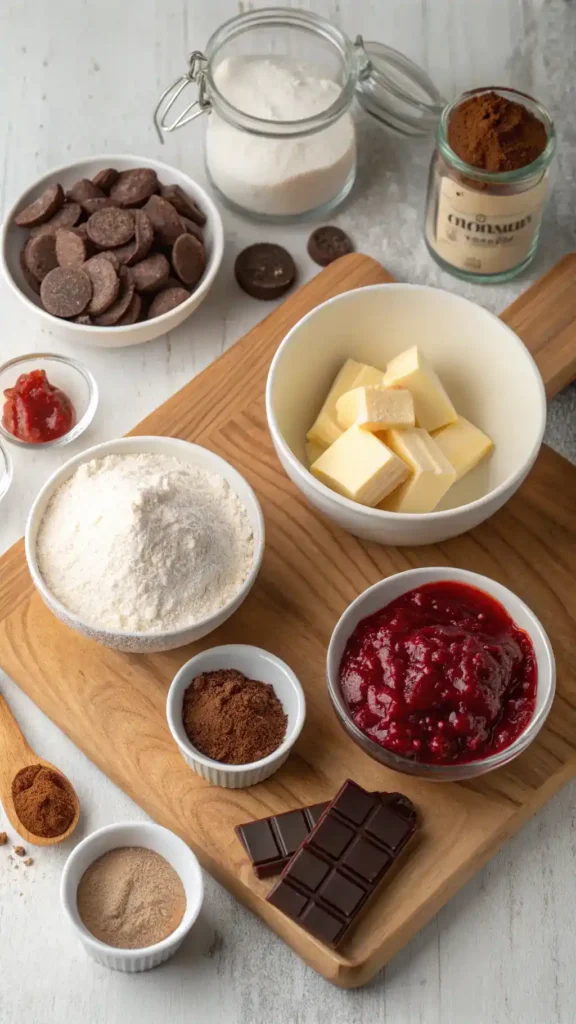
Ingredients
Dry Ingredients
- 1 cup all-purpose flour Foundation of the cookies; almond flour for gluten-free.
- 1/3 cup unsweetened cocoa powder Adds rich chocolate flavor.
- 1/4 teaspoon baking powder Helps cookies rise.
Wet Ingredients
- 1/2 cup granulated sugar Sweetness; can substitute with coconut sugar.
- 1/2 cup softened butter Gives tender texture; can use coconut oil for dairy-free.
- 1 teaspoon vanilla extract Adds depth to flavor.
- 1/2 cup chocolate chips For melting and drizzling on top.
- 1/4 cup jam or fruit preserves Choose favorite flavor for thumbprint.
Instructions
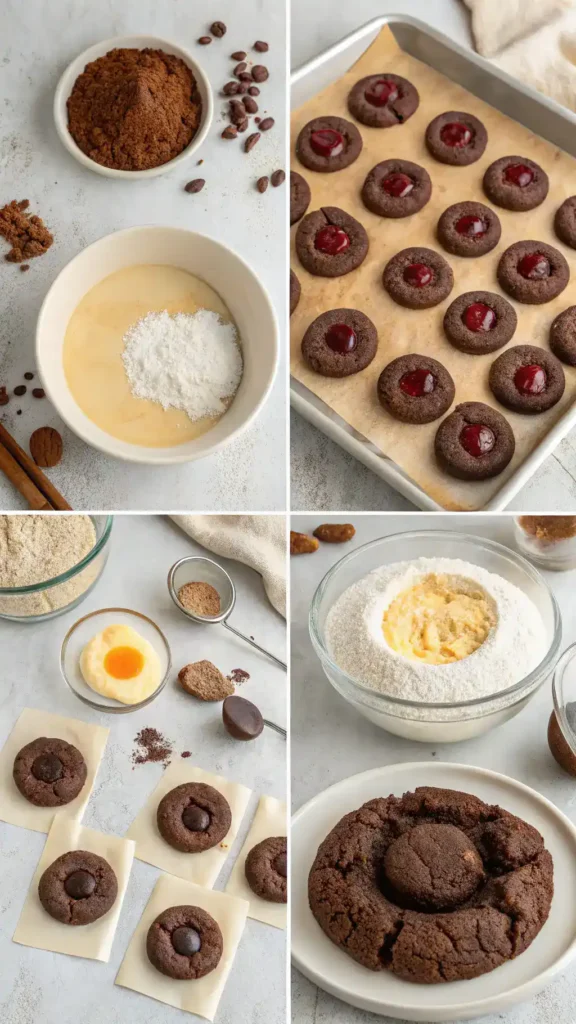
Preparation
- Gather your ingredients. You will need all-purpose flour, unsweetened cocoa powder, granulated sugar, softened butter, vanilla extract, baking powder, and your favorite jam or fruit preserves.
Baking
- Preheat your oven to 350°F (175°C).
- In a medium bowl, whisk together the all-purpose flour, unsweetened cocoa powder, and baking powder.
- Cream the softened butter and granulated sugar together until light and fluffy.
- Add the vanilla extract to the butter mixture and mix until well combined.
- Gradually add the dry mixture to the wet ingredients and stir until just combined.
- Scoop out tablespoon-sized portions of dough and roll them into balls. Place them on a baking sheet lined with parchment paper.
- Press down in the center of each dough ball to create a thumbprint.
- Spoon a small amount of jam or fruit preserves into each thumbprint.
- Bake for 12-15 minutes until set but still soft in the center.
- Let the cookies cool on the baking sheet for a few minutes, then transfer to a wire rack to cool completely.
Video
Notes
| Calories | Fat | Protein | Carbs |
|---|---|---|---|
| 120 | 6g | 2g | 16g |
Key Benefits
Chocolate Thumbprint Cookies are not just an indulgent treat; they offer a delightful experience for both bakers and eaters alike. Here are some key benefits that make these cookies a must-try:
- Easy to Make: These cookies are straightforward to prepare, making them perfect for bakers of all skill levels. With just a few simple steps, you can create a delicious batch that will impress everyone.
- Kid-Friendly: Kids love getting involved in the kitchen, and making Chocolate Thumbprint Cookies is a fun activity for the whole family. They can help shape the dough and choose their favorite fillings!
- Versatile Dessert: One of the best things about Chocolate Thumbprint Cookies is their versatility. You can fill them with various jams, chocolate ganache, or even nut butter, allowing you to customize them for any occasion.
- Gluten-Free Option Gluten-Free Diet: If you or your guests have dietary restrictions, you can easily make these cookies gluten-free by substituting all-purpose flour with a gluten-free blend. This way, everyone can enjoy this delightful treat.
- Perfect for Any Occasion: Whether it’s a holiday gathering, a birthday party, or just a cozy afternoon snack, Chocolate Thumbprint Cookies fit right in. They are sure to be a hit at any event!
In summary, Chocolate Thumbprint Cookies are not only delicious but also adaptable to various tastes and dietary needs. So, gather your ingredients and get ready to bake a batch that everyone will love!
Ingredients
To create these delightful Chocolate Thumbprint Cookies, gather the following essential ingredients:
- 1 cup all-purpose flour: This is the foundation of your cookies. If you’re looking for a gluten-free option, almond flour works beautifully!
- 1/3 cup unsweetened cocoa powder: This adds that rich chocolate flavor. Make sure to choose a high-quality cocoa for the best taste.
- 1/2 cup granulated sugar: Sweetness is key! You can substitute with coconut sugar for a healthier alternative.
- 1/2 cup softened butter: Butter gives your cookies a tender texture. If you prefer a dairy-free option, coconut oil or vegan butter can be used instead.
- 1/4 teaspoon baking powder: This helps your cookies rise slightly, creating a nice texture.
- 1 teaspoon vanilla extract: This adds depth to the flavor. For a twist, try almond extract!
- 1/2 cup chocolate chips: These are for melting and drizzling on top. Dark chocolate chips are a fantastic choice for a richer taste.
- 1/4 cup jam or fruit preserves: This is the star of the thumbprint! Choose your favorite flavor, such as raspberry or apricot, to complement the chocolate.
Each ingredient plays a crucial role in achieving the perfect texture and flavor of your Chocolate Thumbprint Cookies. So, take your time selecting the best quality ingredients, as they truly make a difference!
How to Make Chocolate Thumbprint Cookies
Making Chocolate Thumbprint Cookies is a delightful journey that anyone can embark on. Follow these simple steps to create these indulgent treats that are sure to impress!
- Gather Your Ingredients: Start by collecting all your ingredients. You will need all-purpose flour, unsweetened cocoa powder, granulated sugar, softened butter, vanilla extract, baking powder, and your favorite jam or fruit preserves. Having everything ready will make the process smoother.
- Preheat the Oven: Preheat your oven to 350°F (175°C). This step is crucial because it ensures that your cookies bake evenly and achieve that perfect texture.
- Mix the Dry Ingredients: In a medium bowl, whisk together the all-purpose flour, unsweetened cocoa powder, and baking powder. This helps to evenly distribute the leavening agent, which is essential for a good rise.
- Cream the Butter and Sugar: In a large mixing bowl, cream the softened butter and granulated sugar together until light and fluffy. This process incorporates air into the mixture, resulting in a tender cookie.
- Add the Wet Ingredients: Next, add the vanilla extract to the butter mixture. Mix until well combined. This step adds a lovely flavor to your cookies.
- Combine Wet and Dry Ingredients: Gradually add the dry mixture to the wet ingredients. Stir until just combined. Be careful not to overmix, as this can lead to tough cookies.
- Shape the Dough: Using your hands, scoop out tablespoon-sized portions of dough and roll them into balls. Place them on a baking sheet lined with parchment paper, spacing them about two inches apart.
- Create the Thumbprint: With your thumb or the back of a spoon, gently press down in the center of each dough ball to create a thumbprint. This is where the jam will go, so make sure it’s deep enough!
- Fill with Jam: Spoon a small amount of your chosen jam or fruit preserves into each thumbprint. This step adds a burst of flavor and sweetness to your cookies.
- Bake: Place the baking sheet in the preheated oven and bake for 12-15 minutes. Keep an eye on them; they should be set but still soft in the center.
- Cool: Once baked, remove the cookies from the oven and let them cool on the baking sheet for a few minutes. Then, transfer them to a wire rack to cool completely. This cooling time allows the cookies to firm up.
And there you have it! Your Chocolate Thumbprint Cookies are ready to be enjoyed. Remember, the key to success is in the details, so take your time and savor the process. Happy baking!
Pro Tips, Variations & Common Problems
Making Chocolate Thumbprint Cookies is a delightful experience, but a few tips can elevate your baking game. Here are some pro tips to ensure your cookies turn out perfectly every time:
- Chill the Dough: Before baking, chill your dough for at least 30 minutes. This helps prevent spreading, resulting in thicker cookies.
- Butter Temperature: Use softened butter, but not melted. If your butter is too soft, the cookies may spread too much during baking.
- Don’t Overmix: When combining your ingredients, mix just until they come together. Overmixing can lead to tough cookies.
- Perfect Thumbprint: Use your thumb or the back of a spoon to create a deep enough indentation for the filling. This ensures a generous amount of jam or chocolate ganache in each cookie.
- Experiment with Fillings: While classic jam is delicious, consider using nut butter, caramel, or even chocolate ganache for a twist. Each filling brings a unique flavor profile to your Chocolate Thumbprint Cookies.
- Storage Tips: Store your cookies in an airtight container at room temperature. They stay fresh for up to a week, but they’re usually gone much sooner!
Now, let’s talk about some common problems you might encounter while making Chocolate Thumbprint Cookies and how to troubleshoot them:
- Cookies Spread Too Much: If your cookies are spreading excessively, it’s likely due to warm dough or melted butter. Always chill the dough and ensure your butter is softened, not melted.
- Texture Issues: If your cookies turn out too dry, you may have overbaked them. Keep an eye on the baking time and remove them from the oven when they’re just set. They will continue to firm up as they cool.
- Filling Overflow: If your filling overflows during baking, try making a shallower thumbprint next time. Alternatively, you can add the filling after baking for a neat presentation.
- Flavor Lacking: If your cookies taste flat, ensure you’re using fresh ingredients, especially baking powder. A pinch of salt can also enhance the chocolate flavor.
By keeping these tips and troubleshooting advice in mind, you’ll be well on your way to mastering Chocolate Thumbprint Cookies. Happy baking!
Serving Suggestions for Chocolate Thumbprint Cookies
When it comes to serving Chocolate Thumbprint Cookies, the presentation can elevate their appeal significantly. Here are some delightful ideas to impress your guests and make these cookies the star of your dessert table.
Plating Ideas
Firstly, arrange your Chocolate Thumbprint Cookies on a beautiful dessert platter. You might consider using a tiered stand for a stunning visual effect. Additionally, sprinkle some powdered sugar over the cookies for a touch of elegance. This simple addition not only enhances their appearance but also adds a hint of sweetness.
Pairing Suggestions
Moreover, these cookies pair wonderfully with various beverages. For a cozy afternoon treat, serve them alongside a steaming cup of coffee or a rich hot chocolate. Alternatively, consider offering a selection of herbal teas for a lighter option. This combination will surely delight your guests.
Creative Serving Options
For a more casual setting, you can present the Chocolate Thumbprint Cookies in a rustic basket lined with a pretty cloth. This approach creates a warm, inviting atmosphere. On the other hand, if you’re hosting a formal gathering, consider placing the cookies on individual dessert plates, garnished with fresh berries or a dollop of whipped cream. This not only adds color but also enhances the overall flavor experience.
Family-Style Settings
Additionally, for family gatherings, you can create a cookie bar. Set out your Chocolate Thumbprint Cookies along with various toppings like chopped nuts, sprinkles, or additional jam options. This interactive setup allows everyone to customize their cookies, making it a fun and engaging experience.
Gift Ideas
Lastly, if you’re looking for a thoughtful gift, package your Chocolate Thumbprint Cookies in a decorative box or tin. Add a personal touch with a handwritten note or a festive ribbon. This gesture is sure to warm the hearts of your friends and family.
In conclusion, whether you choose a casual or elegant presentation, these serving suggestions will make your Chocolate Thumbprint Cookies a memorable treat. Enjoy sharing these delightful cookies with your loved ones!
Preserving and Reheating Chocolate Thumbprint Cookies
To keep your Chocolate Thumbprint Cookies fresh and delicious, proper storage is key. First, let’s talk about how to store them. Ideally, you should place your cookies in an airtight container. This method helps maintain their moisture and prevents them from becoming stale. If you plan to enjoy them within a week, storing them at room temperature is perfectly fine. However, if you want to keep them longer, consider freezing them. In the freezer, Chocolate Thumbprint Cookies can last up to three months without losing their delightful flavor and texture. Just make sure to wrap them tightly in plastic wrap or use a vacuum-sealed bag to prevent freezer burn. Additionally, always label your containers with the date to keep track of freshness. Remember, food safety is important, so avoid leaving cookies out at room temperature for more than two hours to prevent any risk of spoilage.
Reheating Methods
When it comes to reheating your Chocolate Thumbprint Cookies, you want to ensure they remain soft and delicious. The oven is your best friend here. Preheat your oven to 350°F (175°C). Then, place the cookies on a baking sheet lined with parchment paper. To keep them moist, cover the cookies loosely with aluminum foil. This step is crucial as it prevents them from drying out. Heat them in the oven for about 5 to 7 minutes. Alternatively, if you’re in a hurry, you can use the microwave. Just place a cookie on a microwave-safe plate and cover it with a damp paper towel. Heat it for about 10 to 15 seconds. This method adds a bit of moisture back into the cookie. However, be careful not to overheat, as this can make them tough. Lastly, if you have an air fryer, you can also reheat them at 300°F (150°C) for about 3 to 4 minutes. This method gives them a nice crispness while keeping the inside soft. With these tips, your Chocolate Thumbprint Cookies will taste just as delightful as the day you baked them!
Conclusion
In conclusion, making Chocolate Thumbprint Cookies is a delightful journey that combines simplicity with indulgence. By mixing together basic ingredients like all-purpose flour, unsweetened cocoa powder, and your choice of jam, you can create a treat that is not only delicious but also versatile. Moreover, this recipe is perfect for bakers of all skill levels, making it an excellent choice for a fun afternoon in the kitchen. So, gather your ingredients and let your creativity shine!
Share Your Experience
We would love to hear about your baking adventures! Feel free to share your results or ask any questions you may have. Additionally, don’t hesitate to experiment with different fillings or toppings to make these cookies your own. Whether you choose to use nut butter, caramel, or even a sprinkle of sea salt, the possibilities are endless. Remember, cooking is all about having fun, and these Chocolate Thumbprint Cookies are a fantastic way to get creative in the kitchen!
FAQs about Chocolate Thumbprint Cookies
Here are some common questions about Chocolate Thumbprint Cookies, along with helpful answers to enhance your baking experience.
1. Can I use a different filling for my Chocolate Thumbprint Cookies?
Absolutely! While jam or fruit preserves are traditional, you can also use nut butter, chocolate ganache, or even caramel. This versatility allows you to customize your cookies according to your taste preferences.
2. Why did my cookies spread too much while baking?
If your Chocolate Thumbprint Cookies spread excessively, it might be due to the butter being too soft. Ensure your butter is softened but not melted. Additionally, chilling the dough for at least 30 minutes before baking can help maintain their shape.
3. How should I store my Chocolate Thumbprint Cookies?
To keep your cookies fresh, store them in an airtight container at room temperature. They will stay delicious for up to a week. If you want to enjoy them warm later, you can reheat them in the oven for a few minutes.
4. Can I make these cookies gluten-free?
Yes, you can! Simply substitute all-purpose flour with a gluten-free flour blend. Make sure to check that all other ingredients, like baking powder and chocolate chips, are also gluten-free to ensure a safe treat.
5. What can I do if my cookies are too dry?
If your Chocolate Thumbprint Cookies turn out dry, it might be due to overbaking or too much flour. To remedy this, try adding a little more butter or an egg to the dough next time. Also, keep an eye on the baking time to ensure they remain soft and chewy.