
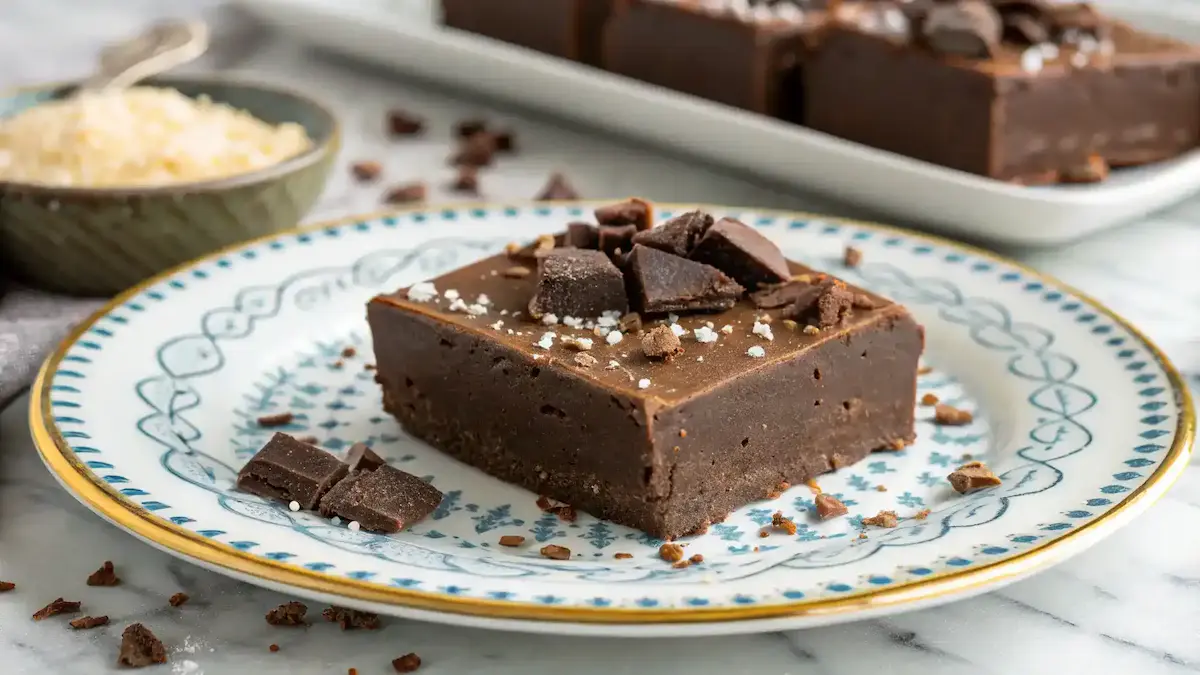
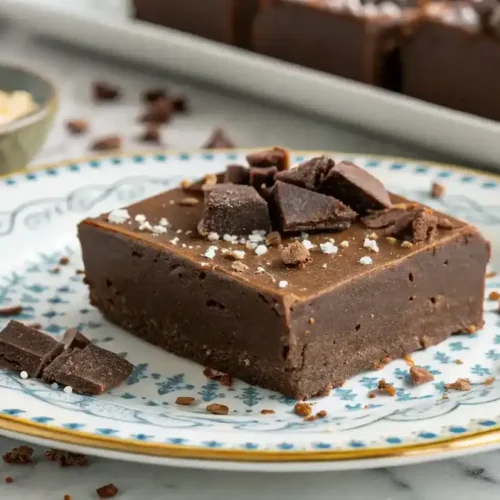
Indulge in Nostalgia with Old-Fashioned Hershey’s Cocoa Fudge
Are you ready to embark on a delightful journey back to your childhood? Hershey’s Cocoa Fudge is not only a simple and easy dessert to prepare, but it also brings a rich flavor that will satisfy any chocolate lover’s cravings. This homemade treat is perfect for family gatherings or special occasions, and it evokes a sense of nostalgia that many of us cherish. Moreover, it’s a gluten-free option that everyone can enjoy. So, gather your ingredients and let’s dive into the sweet world of Hershey’s Cocoa Fudge! Fudge is a type of soft, creamy candy traditionally made by heating sugar, butter, and milk, then beating the mixture as it cools to achieve its smooth texture (https://en.wikipedia.org/wiki/Fudge).
Table of Contents
Hershey’s Cocoa Fudge
Equipment
- 1 – Medium saucepan For cooking the fudge mixture.
- 1 Baking dish Greased for pouring the fudge.
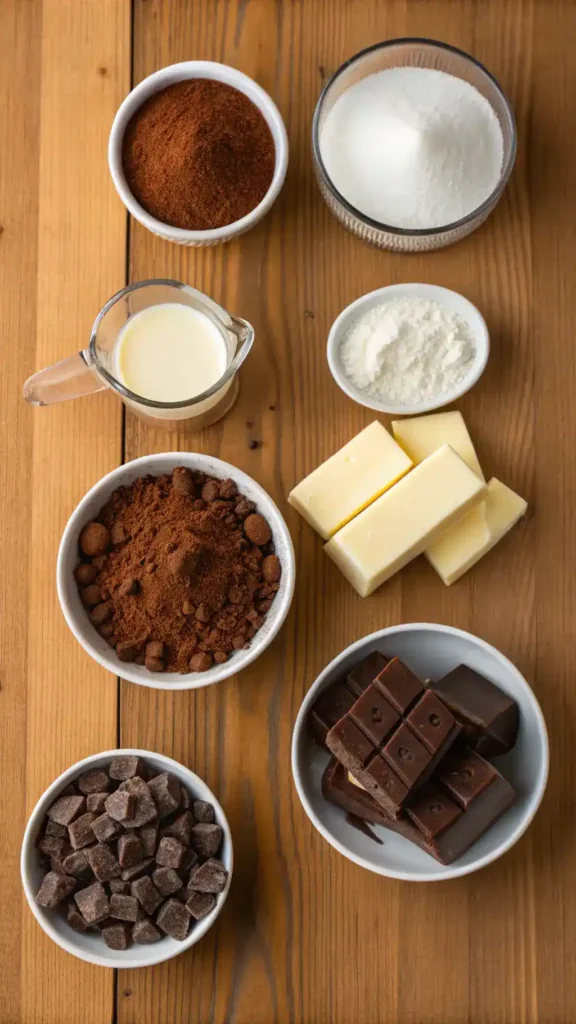
Ingredients
Dry Ingredients
- 1 cup Hershey’s Cocoa Unsweetened cocoa powder.
- 2 cups granulated sugar Standard granulated sugar.
Wet Ingredients
- ½ cup unsalted butter Use unsalted for better control over saltiness.
- 1 cup whole milk Can substitute with coconut or almond milk.
- 1 teaspoon vanilla extract For flavor enhancement.
- a pinch salt Balances sweetness.
Instructions
Preparation Steps
- In a medium saucepan, combine the sugar, cocoa powder, and salt. Stir well to ensure there are no lumps.
- Add the butter and milk to the mixture. Then, cook over medium heat, stirring constantly until the mixture comes to a boil.
- Once boiling, allow it to boil for 4-5 minutes without stirring. This step is crucial for achieving the right fudge consistency.
- Remove the saucepan from heat and add the vanilla extract. Stir until the mixture is smooth and well combined.
- Pour the fudge mixture into a greased baking dish. Make sure to spread it evenly for uniform thickness.
- Let it cool completely at room temperature before cutting into squares. This cooling time is essential for the fudge to set properly.
Video
Notes
Key Benefits
Discover the rich flavor and easy preparation of Hershey’s Cocoa Fudge. This homemade treat not only satisfies your chocolate cravings but also brings a sense of nostalgia, making it an ideal dessert for family gatherings. Plus, it’s a gluten-free option that everyone can enjoy!
Here are some key benefits of making Hershey’s Cocoa Fudge at home:
- Rich Flavor: The deep, chocolatey taste of Hershey’s Cocoa elevates your fudge, ensuring every bite is a delightful indulgence.
- Easy Preparation: With just a few simple ingredients, you can whip up this fudge in no time, making it perfect for both novice and experienced bakers.
- Homemade Treat: There’s something special about homemade desserts. They carry a personal touch that store-bought options simply can’t match.
- Nostalgic Dessert: This recipe often reminds many of childhood memories, making it a great way to connect with family and friends over sweet moments.
- Gluten-Free Option: Hershey’s Cocoa Fudge is naturally gluten-free, allowing everyone to indulge without worry.
- Family-Friendly Recipe: Kids love chocolate, and this fudge is a fantastic way to get them involved in the kitchen!
In summary, making Hershey’s Cocoa Fudge not only satisfies your sweet tooth but also creates lasting memories with loved ones. So, gather your ingredients and get ready to enjoy this delightful chocolate indulgence!
Ingredients for Hershey’s Cocoa Fudge
To create your delightful Hershey’s Cocoa Fudge, gather the following ingredients:
- 1 cup Hershey’s Cocoa (unsweetened)
- 2 cups granulated sugar
- ½ cup unsalted butter
- 1 cup whole milk
- 1 teaspoon vanilla extract
- A pinch of salt
When selecting your ingredients, opt for high-quality cocoa powder for a richer flavor. Additionally, if you’re looking for a dairy-free option, consider using coconut milk or almond milk instead of whole milk. For a fun twist, you might also add chocolate chips or chopped nuts to the mixture. This not only enhances the texture but also adds a delightful surprise in every bite!
Remember, the quality of your butter matters too. Unsalted butter allows you to control the saltiness of your fudge, ensuring a perfectly balanced sweetness. So, gather these ingredients and get ready to indulge in a nostalgic chocolate treat that’s sure to please everyone!
How to Make Hershey’s Cocoa Fudge
Making Hershey’s Cocoa Fudge is a breeze! Follow these simple steps to create a delicious homemade treat that everyone will love:
- In a medium saucepan, combine the sugar, cocoa powder, and salt. Stir well to ensure there are no lumps.
- Add the butter and milk to the mixture. Then, cook over medium heat, stirring constantly until the mixture comes to a boil.
- Once boiling, allow it to boil for 4-5 minutes without stirring. This step is crucial for achieving the right fudge consistency.
- Remove the saucepan from heat and add the vanilla extract. Stir until the mixture is smooth and well combined.
- Pour the fudge mixture into a greased baking dish. Make sure to spread it evenly for uniform thickness.
- Let it cool completely at room temperature before cutting into squares. This cooling time is essential for the fudge to set properly.
To ensure your fudge turns out perfectly, remember to keep an eye on the cooking time. Overcooking can lead to a grainy texture, while undercooking may result in a soft fudge. Additionally, if you want to add a twist, consider incorporating chocolate chips or nuts during the mixing stage. This will enhance the flavor and texture of your Hershey’s Cocoa Fudge!
Pro Tips, Variations, and Common Problems
Making the perfect Hershey’s Cocoa Fudge can be a delightful experience, but it’s essential to keep a few pro tips in mind to ensure success. Here’s what you need to know:
Pro Tips
– Always measure your ingredients accurately. This step is crucial because even a slight variation can affect the texture of your fudge.
– Stir constantly while cooking until the mixture reaches a boil. This practice helps prevent burning and ensures even cooking.
– Use a candy thermometer if you have one. Aim for a temperature of around 234°F (112°C) for the perfect fudge consistency.
– Allow the fudge to cool completely before cutting. This waiting period helps it set properly, making it easier to slice into neat squares.
Creative Variations
– For a nutty twist, consider adding chopped walnuts or pecans to the fudge mixture just before pouring it into the pan.
– If you’re a fan of mint, try incorporating a teaspoon of peppermint extract for a refreshing mint chocolate fudge.
– Want to spice things up? Add a pinch of cinnamon or a dash of espresso powder for a unique flavor profile.
Common Problems and Solutions
Even the best bakers encounter challenges. Here are some common issues and how to solve them:
– If your fudge turns out too soft, it may not have cooked long enough. Simply return it to the heat and cook for an additional minute or two, checking the temperature.
– Conversely, if your fudge is too hard, it likely cooked too long. To salvage it, you can melt it down again with a splash of milk, stirring until smooth.
– Grainy texture can occur if the sugar didn’t dissolve properly. To avoid this, ensure you’re stirring constantly and using low heat.
– Lastly, if your fudge doesn’t set, it may need more cooling time. Be patient; sometimes, it just needs a little extra love!
By following these tips and variations, you’ll be well on your way to creating a delicious batch of Hershey’s Cocoa Fudge that everyone will love. Happy cooking!
Serving Suggestions for Hershey’s Cocoa Fudge
When it comes to serving your delightful Hershey’s Cocoa Fudge, presentation is key! Not only does it enhance the visual appeal, but it also elevates the overall experience for your guests. Here are some creative ideas to make your fudge shine:
- Elegant Dessert Platter: Arrange your fudge squares on a beautiful dessert platter. Consider adding fresh berries, such as strawberries or raspberries, alongside the fudge. This not only adds color but also a refreshing contrast to the rich chocolate.
- Family-Style Serving: For a cozy family gathering, place the fudge in a rustic wooden bowl. Pair it with a scoop of vanilla ice cream or whipped cream on the side. This creates a warm, inviting atmosphere where everyone can help themselves.
- Individual Treats: Cut the fudge into small squares and place them in decorative cupcake liners. This makes for a charming presentation, especially for parties or celebrations. You can even sprinkle some sea salt on top for an extra touch!
- Festive Occasions: During holidays, consider wrapping pieces of fudge in colorful cellophane and tying them with a ribbon. These make delightful gifts for friends and family, showcasing your homemade chocolate indulgence.
- Pairing Suggestions: Serve your Hershey’s Cocoa Fudge with a side of hot chocolate or coffee. The combination of warm beverages with the rich fudge creates a comforting experience, perfect for chilly evenings.
Ultimately, the way you serve your Hershey’s Cocoa Fudge can transform it from a simple dessert into a memorable centerpiece. So, whether you’re hosting a casual get-together or an elegant dinner, these serving suggestions will surely impress your guests!
Preserving and Reheating Your Hershey’s Cocoa Fudge
To keep your delicious Hershey’s Cocoa Fudge fresh and flavorful, proper storage is key. First, let’s talk about how to store it. Ideally, you should place your fudge in an airtight container. This will help prevent it from drying out or absorbing any unwanted odors from your fridge. If you plan to enjoy it within a week, storing it at room temperature is perfectly fine. However, for longer-lasting freshness, refrigerate it, where it can stay good for up to two weeks. If you want to keep it even longer, consider freezing it. Wrapped tightly in plastic wrap and then placed in a freezer-safe bag or container, your fudge can last for up to three months in the freezer. Just remember to label it with the date, so you know when to enjoy it! Additionally, always ensure your fudge is completely cooled before storing it. This helps prevent condensation, which can lead to spoilage or bacterial growth. So, to sum up, store your Hershey’s Cocoa Fudge in an airtight container at room temperature for up to a week, in the fridge for two weeks, or freeze it for three months.
Reheating Methods
When it comes to reheating your Hershey’s Cocoa Fudge, you want to preserve that rich flavor and smooth texture. There are several methods you can use, and I’ll walk you through the best ones. If you prefer the oven, preheat it to 350°F (175°C). Place your fudge in an oven-safe dish, cover it with aluminum foil to retain moisture, and heat for about 10 minutes. This method ensures even warming without drying it out. Alternatively, the stovetop is another great option. Simply cut your fudge into smaller pieces and place them in a non-stick skillet over low heat. Stir gently until warmed through, which should take about 5 minutes. If you’re short on time, the microwave is a quick solution. Just place a piece of fudge on a microwave-safe plate, cover it with a damp paper towel, and heat in 10-second intervals until soft. Be careful not to overheat, as this can lead to a tough texture. Lastly, if you have an air fryer, you can reheat your fudge at 300°F (150°C) for about 5 minutes. This method gives a nice, slightly crispy exterior while keeping the inside gooey. Remember, adding a tiny splash of milk or a pat of butter before reheating can help refresh the fudge and keep it moist. So, whether you choose the oven, stovetop, microwave, or air fryer, you can enjoy your Hershey’s Cocoa Fudge just like it was freshly made!
Conclusion
As you wrap up your delightful journey of making Hershey’s Cocoa Fudge, let’s take a moment to appreciate the simplicity and joy of this recipe. By combining just a few key ingredients—Hershey’s Cocoa, sugar, butter, and milk—you’ve created a rich, chocolate indulgence that’s not only easy to prepare but also perfect for sharing with family and friends. This homemade treat is a nostalgic dessert that brings warmth and sweetness to any occasion, making it an excellent choice for both seasoned bakers and those new to the kitchen.
Now, I encourage you to take the plunge and try making this fudge yourself! Don’t hesitate to share your results or ask any questions you might have; I’m here to help. Additionally, feel free to experiment with variations—perhaps adding nuts or a hint of mint for a unique twist. Remember, cooking is all about creativity and having fun, and Hershey’s Cocoa Fudge is a fantastic canvas for your culinary imagination. So, gather your ingredients, roll up your sleeves, and enjoy the process of creating this delicious treat!
FAQ About Hershey’s Cocoa Fudge
Welcome to the FAQ section for our delicious Hershey’s Cocoa Fudge recipe! Here, we’ve compiled some of the most common questions to help you create the perfect batch of this nostalgic treat.
1. Can I use Dutch-processed cocoa instead of unsweetened cocoa powder?
While you can use Dutch-processed cocoa, it will alter the flavor slightly. Hershey’s Cocoa Fudge is best with unsweetened cocoa powder, as it provides the rich chocolate taste that makes this fudge so special.
2. How can I tell if my fudge is cooked properly?
To ensure your fudge is cooked correctly, use a candy thermometer. The mixture should reach the soft-ball stage, which is around 234°F (112°C). If you don’t have a thermometer, you can test by dropping a small amount of fudge into cold water; it should form a soft ball that holds its shape.
3. What should I do if my fudge is too soft?
If your fudge turns out too soft, it likely needs more cooking time. Simply return it to the saucepan and cook it over medium heat, stirring constantly until it reaches the right consistency. Remember, patience is key!
4. Can I add flavors or mix-ins to my fudge?
Absolutely! You can customize your Hershey’s Cocoa Fudge by adding ingredients like chopped nuts, chocolate chips, or even a splash of peppermint extract for a festive twist. Just mix them in after removing the fudge from heat.
5. How should I store my fudge?
To keep your Hershey’s Cocoa Fudge fresh, store it in an airtight container at room temperature for up to a week. If you want it to last longer, refrigerate it for up to two weeks. Just remember to let it come to room temperature before serving for the best texture!