
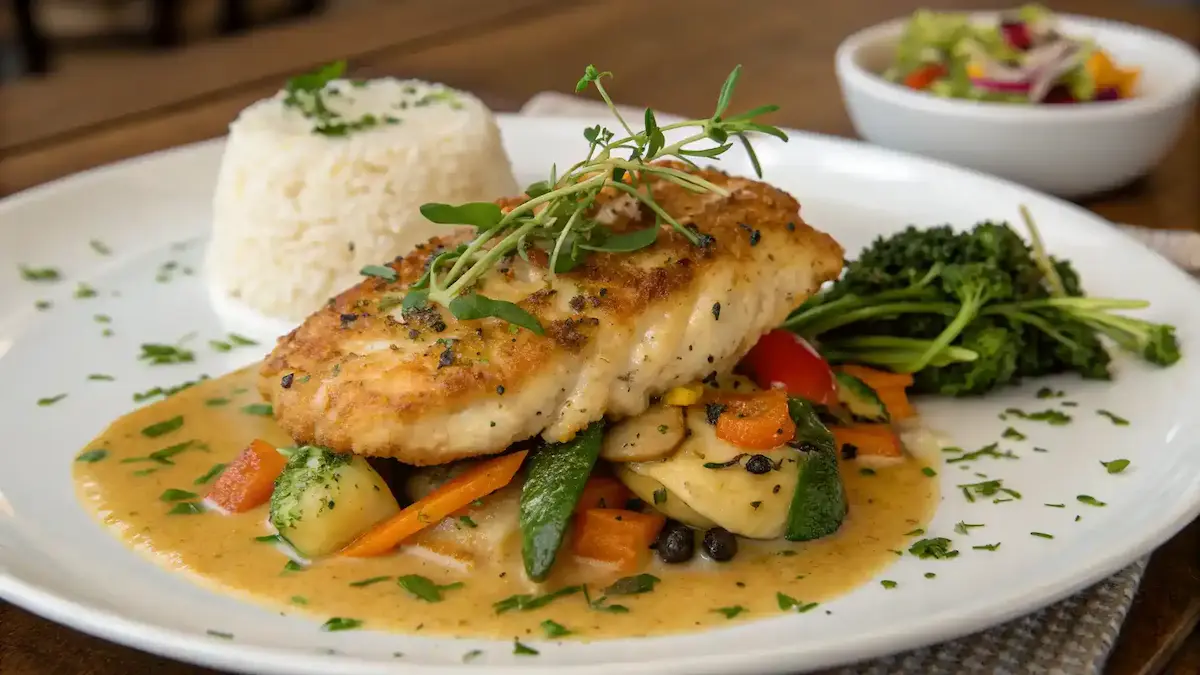
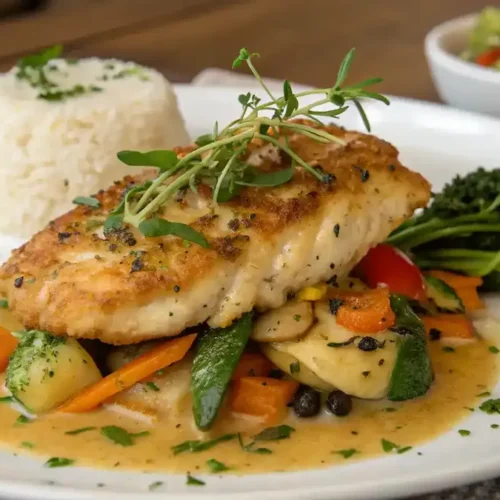
If you’re searching for a quick dinner that the whole family will love, then look no further than this Pan-Fried Honey Butter Chicken. This dish combines the rich flavors of honey and butter, creating a mouthwatering glaze that coats tender chicken breasts beautifully. Not only is it easy to prepare, but it also offers a protein-rich meal that is both satisfying and delicious. Moreover, you can whip it up in no time, making it a perfect choice for busy weeknights. So, gather your ingredients, and let’s dive into this delightful recipe that is sure to become a family favorite!
Table of Contents
Pan-Fried Honey Butter Chicken
Equipment
- 1 Large frying pan For cooking the chicken.
- 1 Small saucepan For melting the honey butter.
- 1 Meat thermometer To check the internal temperature of the chicken.
Ingredients
Chicken
- 2 pieces boneless, skinless chicken breasts Fresh chicken is essential for a juicy outcome.
- 2 tablespoons olive oil Helps achieve a golden-brown crust.
Butter and Honey Mixture
- 1/4 cup unsalted butter Adds creamy richness.
- 1/4 cup honey Opt for natural honey for the best flavor.
Seasoning
- 1 teaspoon garlic powder Enhances the savory notes.
- 1 teaspoon onion powder Adds depth to the dish.
- to taste salt and pepper Seasoning is key.
Optional Spices
- to taste paprika or cayenne For a hint of heat.
Instructions
Prepare the Chicken
- Start with 2 boneless, skinless chicken breasts. If you want to save time, consider slicing them in half horizontally to create thinner cutlets.
Season Generously
- In a bowl, season the chicken with salt, pepper, garlic powder, and onion powder. Coat both sides well.
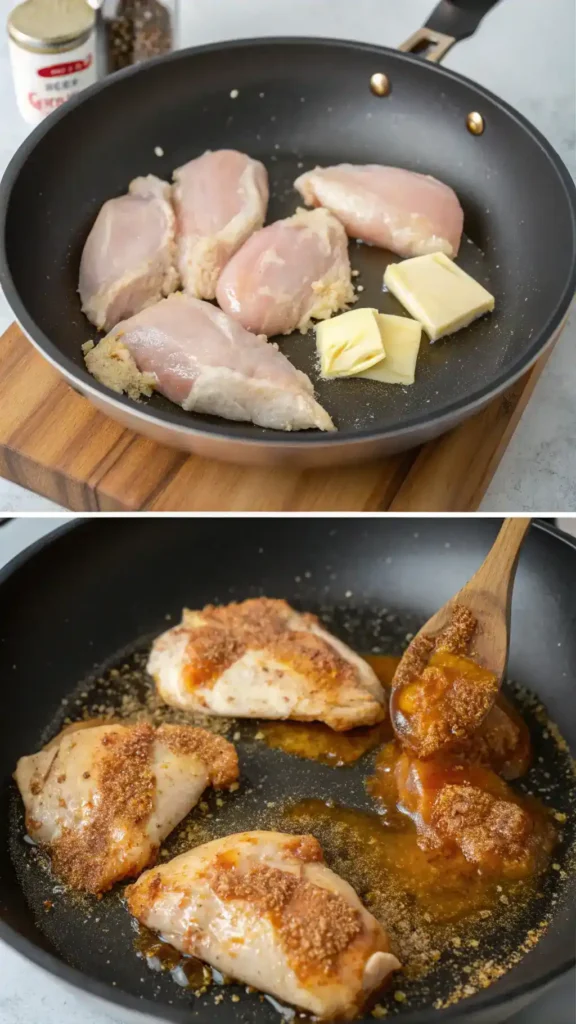
Heat the Pan
- In a large frying pan, heat 2 tablespoons of olive oil over medium-high heat until hot.
Cook the Chicken
- Place the seasoned chicken in the pan. Cook for about 5-7 minutes on each side, or until the internal temperature reaches 165°F.
Make the Honey Butter
- While the chicken is cooking, melt 1/4 cup of unsalted butter in a small saucepan over low heat. Stir in the honey until well combined.
Glaze the Chicken
- Once the chicken is cooked through, pour the honey butter mixture over the chicken in the pan. Simmer for an additional 2-3 minutes, turning the chicken to coat it evenly.
Serve and Enjoy
- Remove the chicken from the pan and let it rest for a couple of minutes. Slice if desired, and drizzle any remaining honey butter sauce over the top.
Video
Notes
| Calories | Fat | Protein | Carbs |
|---|---|---|---|
| 350 | 20g | 30g | 15g |
Key Benefits
When it comes to quick and delicious meals, Pan-Fried Honey Butter Chicken stands out for several reasons. First and foremost, this dish is not only tasty but also packed with nutritional benefits. Here’s why you’ll love making it:
- Healthy Chicken Recipe: Chicken is a fantastic source of lean protein, which is essential for muscle growth and repair. Moreover, it’s low in fat, making it a great choice for a healthy diet.
- Quick Dinner: If you’re short on time, this recipe is your best friend. You can whip it up in under 30 minutes, making it perfect for busy weeknights.
- Family-Friendly Meal: Kids and adults alike will enjoy the sweet and savory flavors of Pan-Fried Honey Butter Chicken. It’s a dish that brings everyone to the table, creating a warm family atmosphere.
- Protein-Rich Dish: With chicken as the star ingredient, you’re serving up a meal that’s rich in protein. This helps keep you full longer and supports overall health.
- Easy Cooking Method: The pan-frying technique is straightforward, allowing even novice cooks to achieve a delicious result. Plus, it gives the chicken a lovely golden-brown crust that’s hard to resist.
In summary, Pan-Fried Honey Butter Chicken is not just a meal; it’s a delightful experience that combines health, speed, and family enjoyment. So, gather your ingredients and get ready to savor this fantastic dish!
Ingredients for Pan-Fried Honey Butter Chicken
Creating the perfect Pan-Fried Honey Butter Chicken starts with selecting quality ingredients. Each component plays a crucial role in delivering that delightful balance of sweet and savory flavors. Here’s what you’ll need:
- 2 boneless, skinless chicken breasts – Fresh chicken is essential for a juicy outcome. If you prefer, you can use chicken thighs for a richer flavor.
- 1/4 cup unsalted butter – This adds a creamy richness. Remember, unsalted butter allows you to control the saltiness of the dish.
- 1/4 cup honey – Opt for natural honey for the best flavor. Alternatively, you can use maple syrup for a different twist.
- 1 teaspoon garlic powder – This enhances the savory notes beautifully. You can also use fresh minced garlic if you prefer.
- 1 teaspoon onion powder – It complements the garlic and adds depth to the dish.
- Salt and pepper to taste – Seasoning is key, so adjust according to your preference.
- 2 tablespoons olive oil – This helps achieve that golden-brown crust. You can substitute with avocado oil if desired.
- Optional spices – Consider adding paprika or cayenne for a hint of heat, if you like a little kick.
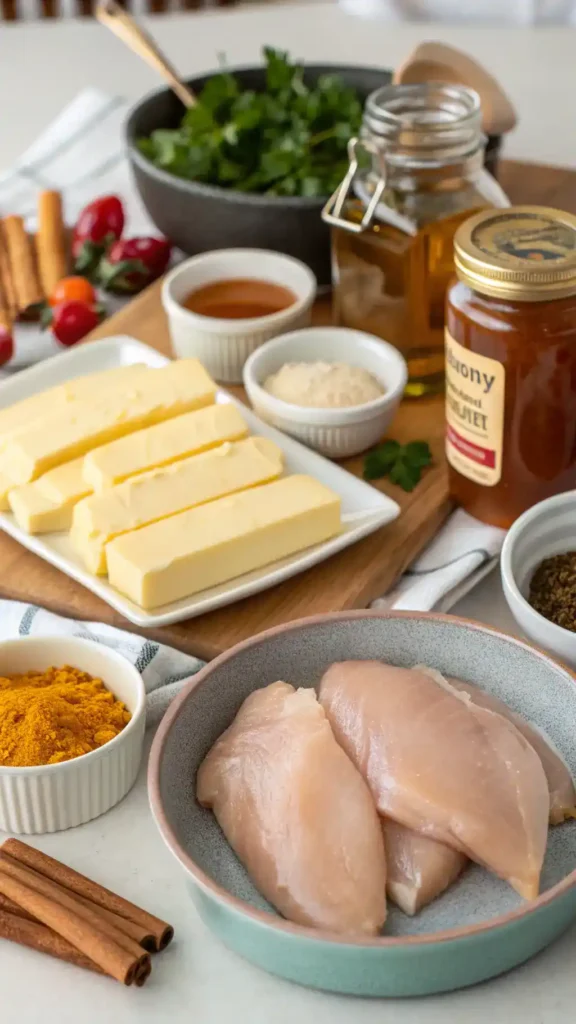
With these ingredients, you’re well on your way to crafting a delicious, protein-rich dish that’s perfect for a quick dinner. Not only is this recipe family-friendly, but it also showcases the health benefits of chicken, making it a nutritious choice for any meal. So, gather your ingredients and let’s get cooking!
How to Make Pan-Fried Honey Butter Chicken
Making Pan-Fried Honey Butter Chicken is not only simple but also a delightful way to enjoy a quick dinner. Follow these easy steps, and you’ll have a delicious, family-friendly meal on the table in no time!
- Prepare the Chicken: Start with 2 boneless, skinless chicken breasts. If you want to save time, consider slicing them in half horizontally to create thinner cutlets. This will help them cook faster and evenly.
- Season Generously: In a bowl, season the chicken with salt, pepper, garlic powder, and onion powder. Make sure to coat both sides well. This step is crucial for flavor, so don’t skip it!
- Heat the Pan: In a large frying pan, heat 2 tablespoons of olive oil over medium-high heat. You want the oil hot enough to sizzle when the chicken hits the pan, which ensures a golden-brown finish.
- Cook the Chicken: Place the seasoned chicken in the pan. Cook for about 5-7 minutes on each side, or until the internal temperature reaches 165°F. If you’re unsure, use a meat thermometer for accuracy.
- Make the Honey Butter: While the chicken is cooking, melt 3 tablespoons of unsalted butter in a small saucepan over low heat. Once melted, stir in 1/4 cup of honey until well combined. This mixture will add a sweet and rich flavor to your chicken.
- Glaze the Chicken: Once the chicken is cooked through, pour the honey butter mixture over the chicken in the pan. Allow it to simmer for an additional 2-3 minutes, turning the chicken to coat it evenly. This step enhances the flavor and gives the chicken a beautiful glaze.
- Serve and Enjoy: Remove the chicken from the pan and let it rest for a couple of minutes. Slice it if desired, and drizzle any remaining honey butter sauce over the top. Serve your Pan-Fried Honey Butter Chicken with your favorite sides for a complete meal!
By following these steps, you’ll create a mouthwatering Pan-Fried Honey Butter Chicken that’s sure to impress your family and friends. Enjoy the delightful combination of sweet and savory flavors!
Pro Tips, Variations, and Common Problems
When it comes to making Pan-Fried Honey Butter Chicken, a few expert tips can elevate your dish from good to unforgettable. Here are some insider secrets to ensure your chicken turns out perfectly every time.
Pro Tips
– Marinate for Flavor: For an extra burst of flavor, consider marinating your chicken breasts in a mixture of honey, garlic powder, and a splash of lemon juice for at least 30 minutes before cooking. This not only enhances the taste but also tenderizes the meat.
– Use a Meat Thermometer: To achieve that perfect doneness, use a meat thermometer. Chicken should reach an internal temperature of 165°F (75°C). This ensures your Pan-Fried Honey Butter Chicken is juicy and safe to eat.
– Don’t Overcrowd the Pan: When frying, make sure not to overcrowd the pan. This allows the chicken to brown evenly and prevents steaming. If you have more chicken than fits comfortably, fry in batches.
– Adjust Heat as Needed: If you notice the chicken is browning too quickly, lower the heat. Conversely, if it’s taking too long, increase the heat slightly. This balance is key to achieving that golden-brown crust.
Variations
– Spice It Up: For those who enjoy a kick, add a pinch of cayenne pepper or smoked paprika to the flour mixture. This will give your Pan-Fried Honey Butter Chicken a delightful heat that contrasts beautifully with the sweetness of the honey.
– Herb Infusion: Incorporate fresh herbs like thyme or rosemary into the honey butter mixture for an aromatic twist. This adds depth and freshness to your dish.
– Alternative Sweeteners: If you’re looking for a healthier option, consider using maple syrup or agave nectar instead of honey. Both will provide a similar sweetness while catering to different dietary preferences.
Common Problems and Solutions
– Chicken Is Dry: If your chicken turns out dry, it may have been overcooked. Always monitor the cooking time and use a meat thermometer for accuracy. Additionally, marinating can help retain moisture.
– Uneven Browning: If your chicken is browning unevenly, it could be due to uneven heat distribution. Make sure your pan is preheated evenly and adjust the heat as needed during cooking.
– Sticky Coating: If the coating is sticking to the pan, ensure you’re using enough oil and that the pan is hot enough before adding the chicken. A well-heated pan helps create a non-stick surface.
By following these pro tips and variations, you’ll master the art of making Pan-Fried Honey Butter Chicken. Remember, cooking is all about experimenting, so feel free to adjust the recipe to suit your taste. Happy cooking!
Serving Suggestions
When it comes to serving Pan-Fried Honey Butter Chicken, the possibilities are as delightful as the dish itself. Traditionally, this flavorful chicken is enjoyed with a variety of sides that complement its sweet and savory profile. Here are some engaging serving suggestions to elevate your dining experience:
- Steamed Rice: A fluffy bed of jasmine or basmati rice is perfect for soaking up the luscious honey butter sauce. This classic pairing not only enhances the flavors but also makes for a satisfying meal.
- Fresh Salads: A crisp green salad with a light vinaigrette adds a refreshing contrast to the rich chicken. Consider using mixed greens, cherry tomatoes, and sliced cucumbers for a vibrant presentation.
- Roasted Vegetables: Seasonal vegetables like carrots, bell peppers, and zucchini, roasted to perfection, provide a colorful and nutritious side. The slight caramelization of the veggies pairs beautifully with the honey butter glaze.
- Mashed Potatoes: Creamy mashed potatoes can serve as a comforting base for the chicken. You might even drizzle some extra honey butter on top for an indulgent touch.
- Garnishing: To finish, sprinkle chopped fresh herbs like parsley or cilantro over the chicken. This not only adds a pop of color but also enhances the dish’s aroma and flavor.
Additionally, consider serving Pan-Fried Honey Butter Chicken on a large platter for a family-style meal. This approach invites everyone to dig in and share, creating a warm, communal atmosphere. Overall, these serving suggestions will not only impress your guests but also make your meal memorable. Enjoy your culinary creation!
Preserving and Reheating Pan-Fried Honey Butter Chicken
Storing and reheating your delicious Pan-Fried Honey Butter Chicken properly is essential to maintain its mouthwatering flavor and crispy texture. Here’s how to do it like a pro!
Storage Tips
To keep your Pan-Fried Honey Butter Chicken fresh, start by letting it cool to room temperature. Then, place it in an airtight container. This will help prevent moisture loss and keep the chicken juicy. You can store it in the refrigerator for up to 3 days. If you want to keep it longer, consider freezing it. In the freezer, it can last for about 2 to 3 months. Just make sure to use vacuum-sealing or freezer-safe bags to avoid freezer burn.
When storing, always label your containers with the date. This way, you can easily track how long it has been stored. Additionally, to ensure food safety, avoid leaving the chicken out at room temperature for more than 2 hours. This helps prevent bacterial growth, keeping your meal safe and delicious.
Reheating Methods
When it’s time to enjoy your leftovers, reheating them correctly is key. The oven is one of the best methods for reheating Pan-Fried Honey Butter Chicken. Preheat your oven to 350°F (175°C). Place the chicken on a baking sheet and cover it loosely with aluminum foil. This helps retain moisture. Heat for about 15-20 minutes, or until warmed through.
If you’re short on time, the stovetop is another great option. Heat a skillet over medium heat and add a splash of water or chicken broth. This will create steam, keeping the chicken moist. Place the chicken in the skillet, cover, and heat for about 5-7 minutes, flipping halfway through.
For a quick reheating method, you can use the microwave. However, be cautious as it can dry out the chicken. Place the chicken on a microwave-safe plate, cover it with a damp paper towel, and heat in 30-second intervals until warmed through. Lastly, if you have an air fryer, it’s perfect for reheating! Set it to 350°F (175°C) and heat for about 5-7 minutes. This method will help restore that crispy exterior.
By following these tips, you can enjoy your Pan-Fried Honey Butter Chicken just as much the second time around. So, go ahead and savor every bite!
Conclusion
As we wrap up this delightful journey of making Pan-Fried Honey Butter Chicken, I hope you feel inspired to dive into your kitchen and give this recipe a try. Not only is it a quick dinner option, but it also brings a touch of sweetness and savory goodness that your family will love. The simplicity and versatility of this dish make it a fantastic choice for any night of the week. So, whether you’re cooking for yourself or a crowd, this protein-rich meal is sure to impress.
I encourage you to share your results in the comments below or ask any questions you might have. Cooking is all about creativity, so feel free to experiment with different spices or side dishes to make this recipe your own. Perhaps you could pair it with a fresh salad or some roasted vegetables for a complete meal. Remember, the kitchen is your playground, and Pan-Fried Honey Butter Chicken is a wonderful canvas for your culinary creativity.
In conclusion, I invite you to embrace the fun of cooking and enjoy every moment of the process. Happy cooking, and I can’t wait to hear how your version of this delicious meal turns out!
FAQs about Pan-Fried Honey Butter Chicken
Here are some common questions you might have about making this delicious dish. We’ve got you covered with helpful answers!
1. Can I use chicken thighs instead of chicken breasts?
Absolutely! Chicken thighs can add extra flavor and juiciness to your Pan-Fried Honey Butter Chicken. Just be sure to adjust the cooking time slightly, as thighs may take a bit longer to cook through.
2. What can I substitute for honey if I want a vegan option?
If you’re looking for a vegan alternative, you can use maple syrup or agave nectar instead of honey. Both options will provide a similar sweetness and work well in this recipe.
3. How do I achieve that perfect golden-brown color?
To get that beautiful golden-brown finish, make sure your pan is hot before adding the chicken. Additionally, avoid overcrowding the pan, as this can lower the temperature and prevent browning. Flip the chicken only once to allow a nice crust to form.
4. Can I make this dish ahead of time?
Yes, you can prepare the chicken ahead of time! Simply cook it, let it cool, and store it in an airtight container in the refrigerator. When you’re ready to serve, reheat it in a skillet over low heat to maintain its flavor and texture.
5. What side dishes pair well with Pan-Fried Honey Butter Chicken?
This dish pairs wonderfully with a variety of sides. Consider serving it with steamed vegetables, rice, or a fresh salad. These options will complement the sweetness of the chicken and create a well-rounded meal.