

Are you ready to embark on a culinary adventure? Pierogi recipes Pierogi are traditional filled dumplings originating from Central and Eastern Europe, particularly Poland: https://en.wikipedia.org/wiki/Pierogi are not just about food; they are a celebration of tradition and family. These delightful dumplings, filled with a variety of ingredients, offer a comforting taste of home. Whether you prefer classic potato and cheese or want to explore creative fillings like spinach and mushrooms, the possibilities are endless. Moreover, making pierogi from scratch is a rewarding experience that brings loved ones together in the kitchen. So, gather your ingredients and let’s dive into the world of pierogi, where every bite tells a story and every recipe is a chance to create lasting memories.
Table of Contents

Pierogi Recipes
Equipment
- 1 Mixing bowl For combining ingredients.
- 1 Rolling Pin For rolling out the dough.
- 1 Pot For boiling the pierogi.
- 1 Skillet For sautéing the pierogi (optional).
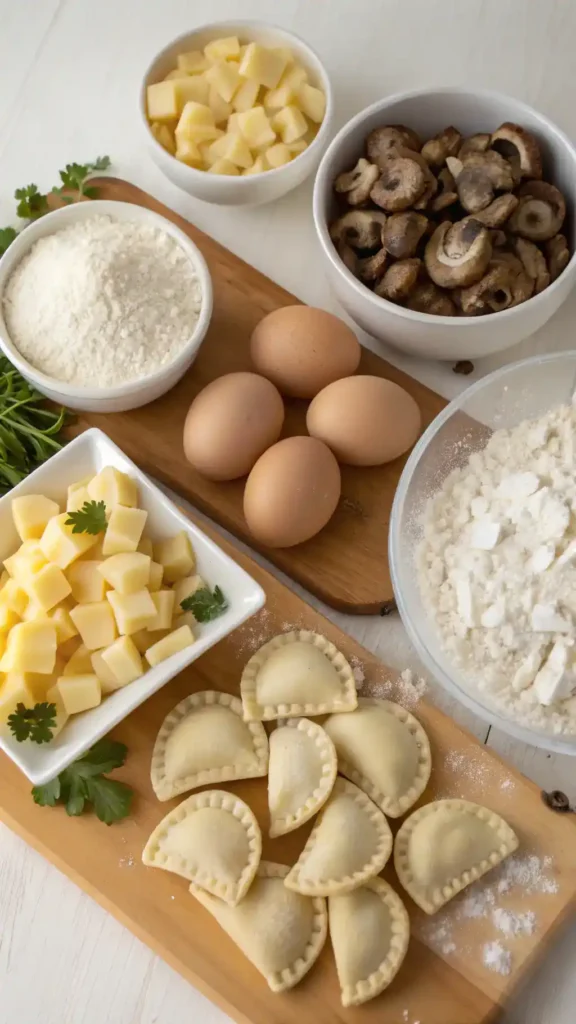
Ingredients
Pierogi Dough Ingredients
- 2 cups all-purpose flour Or gluten-free flour for a gluten-free option.
- 1 large egg For binding the dough.
- 1/2 cup warm water Helps create a soft dough.
- 1/2 teaspoon salt For flavor.
Filling Options
- 2 large potatoes For mashed potato filling.
- 1 cup ricotta cheese For creamy filling.
- 1/2 cup sautéed onions Enhances flavor.
- to taste salt and pepper For seasoning.
Optional Ingredients
- 1 medium onion Sautéed for flavor.
- to taste chives or green onions For garnish.
- to taste sour cream or yogurt For serving.
Instructions
Prepare the Dough
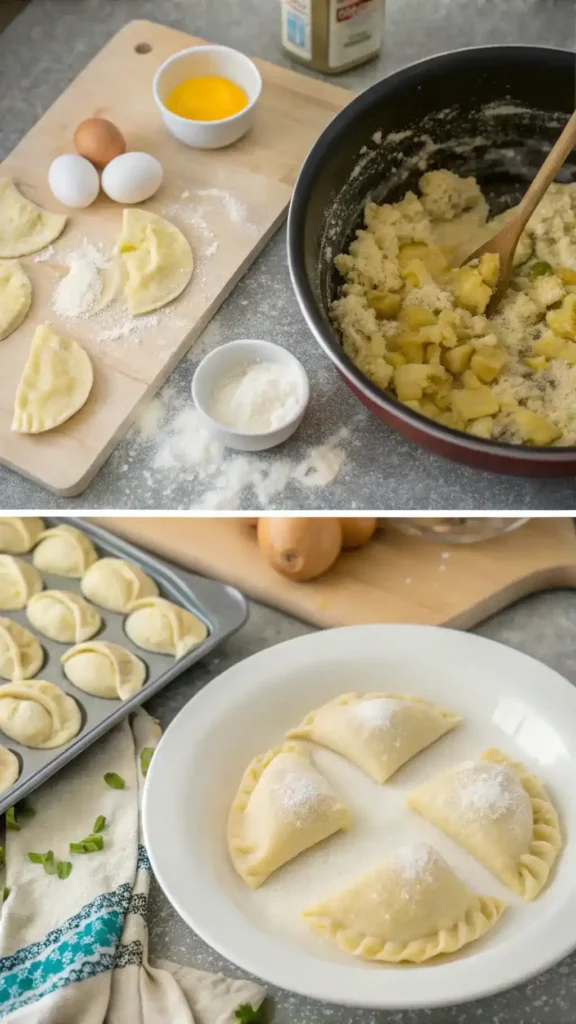
- In a large mixing bowl, combine 2 cups of all-purpose flour and a pinch of salt. Make a well in the center and add 1 large egg and ½ cup of warm water. Gradually mix the flour into the wet ingredients until a dough forms.
Knead the Dough
- Transfer the dough to a floured surface. Knead it for about 5-7 minutes until it becomes smooth and elastic. If the dough is too sticky, add a little more flour.
Rest the Dough
- Cover the kneaded dough with a clean kitchen towel or plastic wrap. Let it rest for at least 30 minutes.
Prepare the Filling
- While the dough rests, prepare your filling. Boil 2 large potatoes until tender. Mash them and mix in 1 cup of ricotta cheese, ½ cup of sautéed onions, and salt and pepper to taste.
Roll Out the Dough
- After resting, divide the dough into smaller portions. Roll each portion out on a floured surface to about 1/8 inch thick. Use a round cutter or a glass to cut out circles, about 3 inches in diameter.
Fill the Pierogi
- Place a teaspoon of filling in the center of each dough circle. Fold the dough over to create a half-moon shape. Press the edges firmly to seal.
Boil the Pierogi
- Bring a large pot of salted water to a boil. Carefully drop the pierogi into the boiling water and cook for about 3-5 minutes or until they float to the surface.
Sauté or Fry (Optional)
- For added flavor, sauté the boiled pierogi in a skillet with a bit of butter until golden brown.
Serve and Enjoy
- Serve your pierogi hot, topped with sautéed onions, a dollop of sour cream, or fresh herbs.
Video
Notes
Key Benefits of Pierogi Recipes
When it comes to comfort food, few dishes can compete with the delightful charm of pierogi. These little dumplings are not just a treat for the taste buds; they also come with a host of benefits that make them a fantastic addition to your culinary repertoire. Here’s why you should consider diving into the world of pierogi recipes:
- Homemade Goodness: Making pierogi from scratch allows you to control the ingredients, ensuring that you use fresh, wholesome components. This means you can create a nutritious meal that’s free from preservatives and artificial additives.
- Customizable Fillings: One of the best things about pierogi is their versatility. You can fill them with a variety of ingredients, such as potatoes, cheese, or even vegetables. This adaptability makes them suitable for different dietary preferences, including vegan and gluten-free options.
- Family-Friendly Fun: Preparing pierogi can be a wonderful family activity. Gather your loved ones, roll out the dough, and create unique fillings together. This not only fosters creativity but also strengthens family bonds through shared culinary experiences.
- Comfort Food at Its Best: Pierogi are the epitome of comfort food. They are warm, hearty, and satisfying, making them perfect for cozy dinners or gatherings. Plus, they evoke a sense of nostalgia, often reminding us of family traditions and cultural heritage.
- Easy to Prepare: Contrary to what you might think, making pierogi is quite straightforward. With a few basic ingredients and some simple steps, you can whip up a batch in no time. This ease of preparation makes them an excellent choice for busy weeknights or last-minute gatherings.
In conclusion, pierogi recipes offer a delightful blend of nutrition, versatility, and comfort. Whether you’re looking to impress guests or simply enjoy a cozy meal at home, these dumplings are sure to bring joy to your table. So, roll up your sleeves and get ready to explore the wonderful world of pierogi!
Ingredients for Perfect Pierogi Recipes
When it comes to making delicious pierogi, the right ingredients are essential. Below, you’ll find a comprehensive list of what you need for both the dough and a variety of mouthwatering fillings. Each ingredient plays a vital role in creating that comforting, homemade goodness we all love.
Pierogi Dough Ingredients
For the dough, you will need:
- 2 cups all-purpose flour (or gluten-free flour for a gluten-free option)
- 1 large egg
- 1/2 cup warm water
- 1/2 teaspoon salt
When selecting flour, consider using high-quality all-purpose flour for the best texture. If you’re looking for a gluten-free alternative, there are excellent gluten-free flour blends available that work wonderfully. Additionally, make sure your water is warm, as it helps to create a soft and pliable dough.
Filling Options
The beauty of pierogi lies in their versatility. Here are some popular filling options:
- Mashed potatoes and cheddar cheese
- Ricotta cheese and spinach
- Sauerkraut and mushrooms
- Sweet cheese (cottage cheese or farmer’s cheese with sugar and vanilla)
- Seasoned ground meat (like chicken or turkey)
Feel free to mix and match these fillings according to your taste preferences. For instance, if you want a vegan option, consider using mashed sweet potatoes or sautéed mushrooms with herbs. Moreover, adding fresh herbs or spices can elevate the flavor profile of your fillings significantly.
Additional Ingredients
To enhance your pierogi experience, consider these optional ingredients:
- Onions (sautéed for a rich flavor)
- Chives or green onions (for garnish)
- Sour cream or yogurt (for serving)
Onions, when sautéed, bring a delightful sweetness that complements the savory fillings. Furthermore, a dollop of sour cream or yogurt adds a creamy texture that balances the dish beautifully. Overall, these ingredients not only enhance the flavor but also add a touch of elegance to your homemade pierogi.
In summary, gathering the right ingredients is the first step in your pierogi-making journey. With these tips and options, you can create a variety of pierogi recipes that cater to every palate. So, roll up your sleeves and get ready to enjoy the process of making these delightful dumplings!
How to Make Pierogi Recipes
Making homemade pierogi is a delightful journey that brings comfort food to your table. Follow these step-by-step instructions to create the perfect pierogi, ensuring a delicious outcome every time.
- Prepare the Dough: In a large mixing bowl, combine 2 cups of all-purpose flour and a pinch of salt. Make a well in the center and add 1 large egg and ½ cup of warm water. Gradually mix the flour into the wet ingredients until a dough forms.
- Knead the Dough: Transfer the dough to a floured surface. Knead it for about 5-7 minutes until it becomes smooth and elastic. If the dough is too sticky, add a little more flour. Remember, the right texture is key!
- Rest the Dough: Cover the kneaded dough with a clean kitchen towel or plastic wrap. Let it rest for at least 30 minutes. This step is crucial as it allows the gluten to relax, making it easier to roll out.
- Prepare the Filling: While the dough rests, prepare your filling. For a classic potato and cheese filling, boil 2 large potatoes until tender. Mash them and mix in 1 cup of ricotta cheese, ½ cup of sautéed onions, and salt and pepper to taste. Feel free to customize your filling with ingredients like spinach or mushrooms!
- Roll Out the Dough: After resting, divide the dough into smaller portions. Roll each portion out on a floured surface to about 1/8 inch thick. Use a round cutter or a glass to cut out circles, about 3 inches in diameter.
- Fill the Pierogi: Place a teaspoon of filling in the center of each dough circle. Fold the dough over to create a half-moon shape. Press the edges firmly to seal, ensuring no filling escapes during cooking. You can also crimp the edges with a fork for a decorative touch.
- Boil the Pierogi: Bring a large pot of salted water to a boil. Carefully drop the pierogi into the boiling water, ensuring not to overcrowd the pot. Cook them for about 3-5 minutes or until they float to the surface. This indicates they are done!
- Sauté or Fry (Optional): For added flavor, you can sauté the boiled pierogi in a skillet with a bit of butter until golden brown. This step adds a delightful crispiness that enhances the overall texture.
- Serve and Enjoy: Serve your pierogi hot, topped with sautéed onions, a dollop of sour cream, or fresh herbs. They make a wonderful family-friendly meal that everyone will love!
By following these steps, you’ll create delicious pierogi recipes that are sure to impress. Enjoy the process and feel free to experiment with different fillings and cooking methods!
Pro Tips, Variations, and Common Problems for Pierogi Recipes
Making pierogi can be a delightful experience, but it’s not without its challenges. Here are some pro tips to help you create the perfect pierogi, along with variations and solutions to common problems you might encounter.
Pro Tips for Perfect Pierogi
– Knead the Dough Well: A well-kneaded dough is key to achieving the right texture. Knead until it’s smooth and elastic, which usually takes about 5-7 minutes.
– Rest the Dough: After kneading, let the dough rest for at least 30 minutes. This helps relax the gluten, making it easier to roll out.
– Use Cold Ingredients: For a tender dough, use cold water and eggs. This helps prevent the dough from becoming too sticky.
– Don’t Overfill: When adding your filling, be careful not to overstuff the pierogi. A teaspoon of filling is usually sufficient. This prevents them from bursting during cooking.
– Seal Properly: Ensure you seal the edges tightly to avoid any leaks. You can use a fork to crimp the edges for a decorative touch.
Creative Variations
– Filling Options: While potato and cheese are classic, consider trying spinach and feta, sauerkraut and mushrooms, or even sweet fillings like berries or chocolate.
– Dough Alternatives: For a gluten-free option, substitute regular flour with a gluten-free blend. Additionally, you can experiment with adding herbs like dill or chives to the dough for extra flavor.
– Cooking Methods: Besides boiling, you can sauté your pierogi in butter for a crispy finish or bake them for a healthier option. Each method brings out different flavors!
Troubleshooting Common Problems
– Dough Too Sticky: If your dough is too sticky, add a little more flour, but do so gradually. Too much flour can make the dough tough.
– Filling Leaks: If your pierogi are leaking during cooking, it’s likely due to insufficient sealing. Make sure to press the edges firmly and consider using a bit of water to help seal them.
– Overcooked Pierogi: To avoid mushy pierogi, boil them until they float, then cook for an additional 2-3 minutes. Overcooking can lead to a gummy texture.
– Underseasoned Filling: Taste your filling before using it. If it lacks flavor, add salt, pepper, or herbs to enhance the taste. Remember, the filling should be flavorful on its own!
By following these tips and variations, you’ll be well on your way to mastering pierogi recipes. Enjoy the process, and don’t hesitate to get creative with your fillings and cooking methods!
Serving Suggestions for Pierogi Recipes
When it comes to serving pierogi, the options are as delightful as the dish itself! Whether you’re hosting a casual family dinner or an elegant gathering, these serving suggestions will elevate your pierogi experience. Let’s dive into some creative ideas that will not only enhance the flavors but also make your presentation truly stunning.
Plating Ideas
To showcase your homemade pierogi, consider these plating tips:
- Arrange pierogi in a circular pattern on a large, colorful platter. This creates a beautiful focal point for your table.
- Garnish with fresh herbs, such as chives or parsley, for a pop of color and freshness.
- For a rustic touch, serve pierogi in a cast-iron skillet, allowing guests to help themselves.
Side Dish Pairings
Pairing pierogi with complementary sides can enhance the meal:
- Serve with a light salad, such as arugula with lemon vinaigrette, to balance the richness of the pierogi.
- Consider a side of sautéed onions or mushrooms to add depth and flavor.
- For a heartier option, a bowl of creamy potato soup can be a comforting addition.
Creative Serving Options
Depending on the occasion, you can serve pierogi in various styles:
- For a casual setting, place a stack of pierogi on a wooden board with dipping sauces like sour cream or a tangy yogurt sauce.
- If you’re aiming for elegance, serve individual portions on fine china, drizzled with a balsamic reduction.
- For family-style dining, set out a large bowl of pierogi alongside bowls of toppings, allowing everyone to customize their plates.
Ultimately, the way you serve your pierogi can transform a simple meal into a memorable experience. So, whether you choose to keep it casual or go all out with presentation, your guests will surely appreciate the effort. Enjoy your culinary adventure with these pierogi recipes, and remember, the joy is in sharing delicious food with loved ones!
Storing and Reheating Perfect Pierogi Recipes
When it comes to enjoying your homemade pierogi, proper storage and reheating are essential to maintain their delightful flavor and texture. After all, you want every bite to be as comforting as the first! Let’s dive into the best ways to store and reheat your pierogi, ensuring they remain a delicious treat for days to come.
Storage Tips
To keep your pierogi fresh, start by allowing them to cool completely before storing. Once cooled, place them in an airtight container. This method keeps moisture out and prevents them from sticking together. If you plan to enjoy them within a few days, refrigerate your pierogi. They will stay fresh in the fridge for about 3 to 5 days. However, if you want to save them for a longer period, freezing is your best bet. For optimal freshness, freeze your pierogi in a single layer on a baking sheet first. Once frozen, transfer them to a freezer bag or vacuum-sealed container. This way, they can last up to 3 months in the freezer without losing their quality. Remember, always label your containers with the date to keep track of their freshness!
Food safety is crucial, so ensure that your pierogi are stored at the right temperature. Bacteria thrive at room temperature, so avoid leaving them out for more than two hours. Additionally, if you notice any off smells or changes in texture, it’s best to err on the side of caution and discard them.
Reheating Methods
Now that you know how to store your pierogi, let’s talk about reheating them without sacrificing their deliciousness. The stovetop method is a favorite among many. Simply heat a skillet over medium heat and add a bit of butter or oil. Once hot, add your pierogi and sauté them for about 3 to 5 minutes on each side until they are heated through and golden brown. This method not only warms them up but also adds a delightful crispiness!
If you prefer a quicker option, the microwave works well too. Place your pierogi on a microwave-safe plate and cover them with a damp paper towel. Heat them in 30-second intervals, flipping them halfway through, until they are warm. However, be cautious not to overcook them, as this can lead to a chewy texture.
For those who love a crispy finish, the air fryer is a fantastic choice. Preheat your air fryer to 350°F (175°C). Arrange the pierogi in a single layer and spray them lightly with cooking oil. Heat for about 5 to 7 minutes, shaking the basket halfway through. This method gives you that perfect crunch while keeping the filling warm and delicious.
Lastly, if you want to refresh your pierogi, consider adding a splash of broth or water to the skillet while reheating. This technique helps to steam them slightly, preventing dryness and ensuring they remain moist and flavorful. With these tips, your pierogi will taste just as delightful as when they were first made!
Conclusion
As we wrap up this delightful journey into making Pierogi Recipes, let’s take a moment to appreciate the simplicity and versatility of this beloved dish. By following the straightforward steps of preparing the dough, choosing your favorite fillings, and mastering the cooking techniques, you’ve created a meal that is not only comforting but also customizable to suit your taste. Whether you opt for classic potato and cheese or experiment with spinach and mushrooms, the possibilities are endless. So, I encourage you to dive into this culinary adventure and enjoy every moment of the process!
Share Your Experience
I would love to hear about your pierogi-making experience! Please feel free to share your results or ask any questions you may have. Additionally, don’t hesitate to explore different variations or pairings that reflect your personal style. Cooking is all about creativity, and Pierogi Recipes offer a fantastic canvas for you to express yourself in the kitchen. Remember, the joy of cooking lies in the journey, so have fun and savor the homemade goodness you create!
Frequently Asked Questions About Pierogi Recipes
Here are some common questions you might have while making these delightful dumplings. We hope these answers help you create the perfect pierogi!
1. What is the best flour to use for pierogi dough?
For the best results, use all-purpose flour. It provides the right balance of elasticity and tenderness. However, if you need a gluten-free option, consider using a gluten-free flour blend. Just ensure it has a binding agent like xanthan gum for the best texture.
2. How do I prevent my pierogi from sticking together?
To prevent sticking, dust your pierogi with flour after shaping them. Additionally, you can place them on a parchment-lined baking sheet. If you’re cooking them right away, ensure your water is boiling before adding the pierogi. This helps them cook evenly and reduces sticking.
3. Can I freeze pierogi, and if so, how?
Yes, you can freeze pierogi! First, arrange them in a single layer on a baking sheet and freeze until solid. Then, transfer them to airtight containers or freezer bags. This method prevents them from sticking together. They can be cooked straight from frozen; just add a few extra minutes to the cooking time.
4. What are some popular fillings for pierogi?
Popular fillings include mashed potatoes with cheese, sauerkraut, mushrooms, and spinach. You can also get creative with fillings like sweetened cottage cheese or fruit for a dessert version. The beauty of pierogi recipes is their versatility, so feel free to experiment!
5. How do I know when my pierogi are done cooking?
When boiling pierogi, they are done when they float to the surface. Allow them to cook for an additional 2-3 minutes once they float. If you’re frying them afterward, look for a golden-brown color on both sides. This indicates they are crispy and ready to enjoy!