
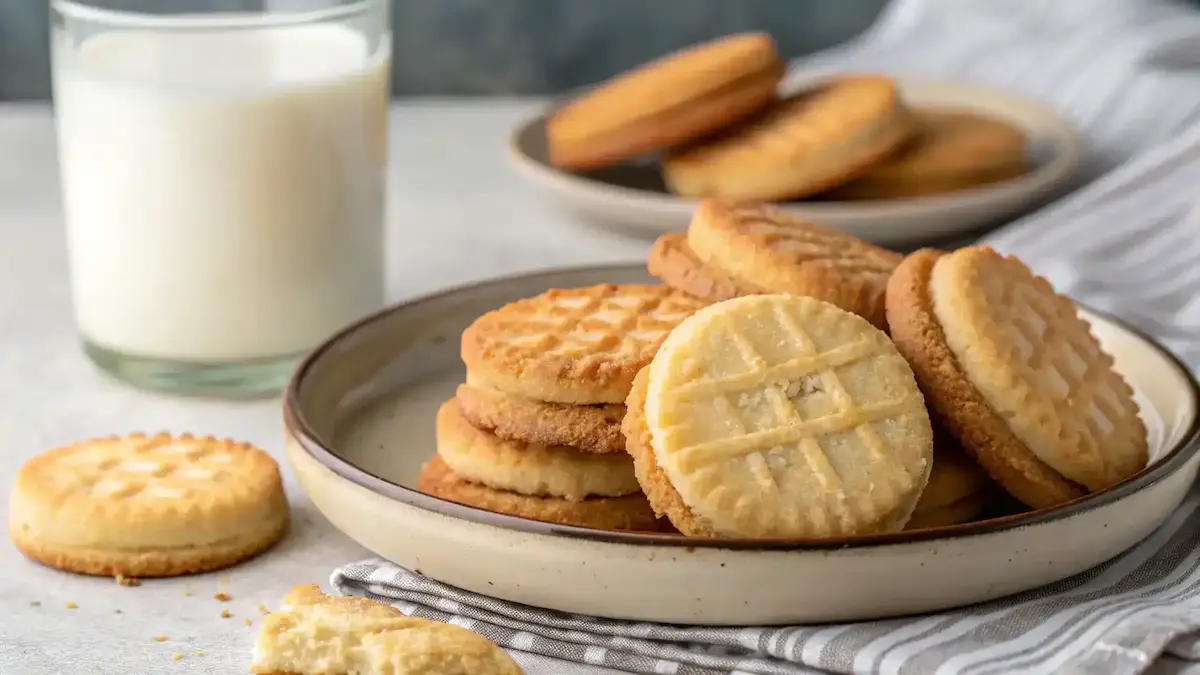
Are you ready to indulge in a sweet and crunchy delight? Vanilla Wafer Cookies are not only easy to make, but they also bring a delightful sweetness that appeals to both kids and adults alike. This versatile dessert can be enjoyed on its own or used as a base for creative treats. For instance, you can pair them with ice cream or use them in a dessert platter. Moreover, these cookies are made from basic pantry items, making them a go-to recipe for any occasion. So, gather your ingredients, and let’s dive into the world of baking these classic Vanilla Wafer Cookies!
For a deeper dive into the origin and cultural significance of vanilla wafers, check out this historical overview on Wikipedia: https://en.wikipedia.org/wiki/Nilla_Wafers

Vanilla Wafer Cookies
Equipment
- 1 Oven Preheat to 350°F (175°C)
- 1 Mixing bowl For mixing dry and wet ingredients
- 1 Baking sheet Line with parchment paper
- 1 Cookie scoop or tablespoon For portioning dough
- 1 wire rack For cooling cookies
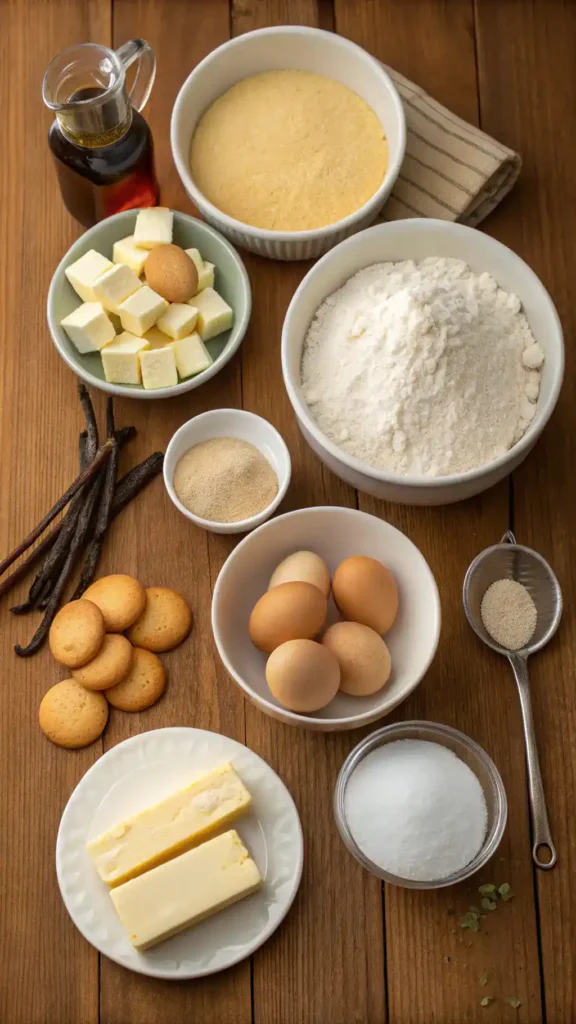
Ingredients
Dry Ingredients
- 1.5 cups all-purpose flour Sifted
- 1 teaspoon baking powder Sifted with flour
- 0.25 teaspoon salt Sifted with flour
Wet Ingredients
- 0.5 cup granulated sugar Can substitute with coconut sugar
- 0.5 cup unsalted butter, softened Can substitute with coconut oil
- 1 tablespoon vanilla extract High-quality recommended
- 1 large egg At room temperature
Instructions
Preparation
- Preheat your oven to 350°F (175°C).
Mixing Dry Ingredients
- In a medium bowl, whisk together the flour, baking powder, and salt.
Creaming
- In a large mixing bowl, beat the softened butter and granulated sugar until light and fluffy.
Adding Eggs and Vanilla
- Add the egg and vanilla extract, mixing well after each addition.
Combining Ingredients
- Gradually add the dry mixture to the wet ingredients, mixing until just combined.
Scooping Dough
- Scoop rounded balls of dough onto a baking sheet lined with parchment paper.
Baking
- Bake for 10-12 minutes or until edges are lightly golden.
Cooling
- Let cookies cool on the baking sheet for 5 minutes, then transfer to a wire rack to cool completely.
Video
Notes
| Calories | Fat | Protein | Carbs |
|---|---|---|---|
| 100 | 5g | 1g | 15g |
Table of Contents
Key Benefits
When it comes to delightful treats, Vanilla Wafer Cookies stand out for several reasons. Firstly, their crunchy texture is simply irresistible. Each bite offers a satisfying snap, making them a favorite for both kids and adults alike. Additionally, the delightful sweetness of these cookies is perfectly balanced, ensuring they’re not overly sugary but just right for satisfying your sweet tooth.
Moreover, Vanilla Wafer Cookies are incredibly easy to make. With just a handful of basic ingredients, you can whip up a batch in no time. This simplicity makes them an excellent choice for novice bakers or anyone looking to create a quick dessert. Furthermore, their versatility as a dessert is noteworthy. You can enjoy them on their own, use them as a base for ice cream sandwiches, or even incorporate them into other recipes, such as pie crusts or layered desserts.
Lastly, these cookies are a kid-friendly snack that can be enjoyed at any time of the day. Whether you’re packing them in a lunchbox or serving them at a family gathering, Vanilla Wafer Cookies are sure to please. So, if you’re looking for a delightful treat that’s simple to prepare and loved by all, look no further than Vanilla Wafer Cookies!
Ingredients for Vanilla Wafer Cookies
Creating the perfect Vanilla Wafer Cookies starts with gathering the right ingredients. Fortunately, most of these are basic pantry items that you likely already have on hand. Here’s what you’ll need:
- 1 ½ cups all-purpose flour
- 1 teaspoon baking powder
- ½ cup granulated sugar
- ½ cup unsalted butter, softened (you can substitute with coconut oil for a dairy-free option)
- 1 tablespoon vanilla extract (the star of the show!)
- 1 large egg
- ¼ teaspoon salt
When selecting your ingredients, opt for high-quality vanilla extract, as it significantly enhances the flavor of your cookies. If you’re looking for a lighter option, consider using a sugar substitute like coconut sugar, which adds a unique twist. Additionally, if you have dietary restrictions, almond milk can replace regular milk in some variations.
Remember, the butter should be softened but not melted, as this helps achieve that delightful crunchy texture. Also, sifting the flour and baking powder together can ensure an even distribution, leading to perfectly baked Vanilla Wafer Cookies. With these ingredients ready, you’re one step closer to baking a batch of these sweet, crispy delights!
How to Make Vanilla Wafer Cookies
Making Vanilla Wafer Cookies is a delightful experience that fills your kitchen with a warm, sweet aroma. Follow these simple steps to create a batch of these classic, crisp cookies that everyone will love!
- Preheat your oven: Start by preheating your oven to 350°F (175°C). This ensures that your Vanilla Wafer Cookies bake evenly and achieve that perfect golden brown color.
- Gather your ingredients: You will need all-purpose flour, baking powder, granulated sugar, unsalted butter, vanilla extract, eggs, and a pinch of salt. Make sure these are at room temperature for the best mixing results.
- Mix the dry ingredients: In a medium bowl, whisk together 2 cups of all-purpose flour, 1 teaspoon of baking powder, and ½ teaspoon of salt. This step is crucial as it helps to evenly distribute the baking powder throughout the flour.
- Cream the butter and sugar: In a large mixing bowl, beat ½ cup of softened unsalted butter and 1 cup of granulated sugar together until the mixture is light and fluffy. This usually takes about 3-5 minutes. Remember, the fluffier the mixture, the better your cookies will be!
- Add the eggs and vanilla: Next, add 2 large eggs, one at a time, mixing well after each addition. Then, stir in 1 tablespoon of vanilla extract. This will give your Vanilla Wafer Cookies that delightful sweetness and aroma.
- Combine wet and dry ingredients: Gradually add the dry mixture to the wet ingredients, mixing until just combined. Be careful not to overmix, as this can lead to tough cookies.
- Scoop the dough: Using a cookie scoop or tablespoon, drop rounded balls of dough onto a baking sheet lined with parchment paper. Make sure to leave some space between each cookie, as they will spread while baking.
- Bake the cookies: Place the baking sheet in the preheated oven and bake for 10-12 minutes, or until the edges are lightly golden. Keep an eye on them, as baking times can vary based on your oven.
- Cool the cookies: Once baked, remove the cookies from the oven and let them cool on the baking sheet for about 5 minutes. Then, transfer them to a wire rack to cool completely. This cooling time is essential for achieving that perfect crunchy texture.
And there you have it! Your Vanilla Wafer Cookies are ready to be enjoyed. Whether you’re snacking on them alone or sharing them with friends and family, these cookies are sure to be a hit!
Pro Tips, Variations & Common Problems
Making Vanilla Wafer Cookies can be a delightful experience, but sometimes things don’t go as planned. Here are some pro tips and variations to elevate your cookie game, along with solutions to common problems you might encounter.
Pro Tips
– Chill the Dough: If you find your cookies spreading too much, try chilling the dough for at least 30 minutes before baking. This helps them hold their shape better.
– Use Fresh Ingredients: Always use fresh baking powder and vanilla extract. This ensures your cookies rise properly and have that delightful vanilla flavor.
– Measure Accurately: Use a kitchen scale for precise measurements. This is especially important for flour, as too much can lead to dry cookies.
– Don’t Overmix: When combining the wet and dry ingredients, mix just until combined. Overmixing can lead to tough cookies instead of the light, crisp texture you want.
Creative Variations
– Chocolate Chip Delight: Add 1 cup of semi-sweet chocolate chips to the dough for a delicious twist on the classic Vanilla Wafer Cookies.
– Nutty Flavor: Incorporate ½ cup of chopped nuts, such as pecans or walnuts, for added crunch and flavor.
– Coconut Bliss: Mix in ½ cup of shredded coconut for a tropical flair that pairs beautifully with vanilla.
– Spice It Up: Add a pinch of cinnamon or nutmeg to the dough for a warm, spiced flavor that complements the vanilla.
Common Problems & Solutions
– Cookies Spread Too Much: If your cookies are spreading excessively, check your butter temperature. It should be softened but not melted. Additionally, chilling the dough can help.
– Cookies Are Too Hard: If your Vanilla Wafer Cookies turn out too hard, they may have been overbaked. Keep an eye on them and remove them from the oven as soon as they are golden brown.
– Lack of Flavor: If your cookies taste bland, ensure you’re using quality vanilla extract. Also, a pinch of salt can enhance the sweetness and overall flavor.
– Uneven Baking: For even baking, rotate your baking sheet halfway through the baking time. This ensures that all cookies bake uniformly.
With these tips and variations, you’ll be well on your way to mastering Vanilla Wafer Cookies. Remember, baking is as much about experimentation as it is about following a recipe. Enjoy the process and happy baking!
Serving Suggestions for Vanilla Wafer Cookies
When it comes to serving Vanilla Wafer Cookies, the possibilities are as delightful as the cookies themselves! Whether you’re hosting a casual gathering or a festive celebration, these cookies can shine in various settings. Here are some creative and visually appealing ways to present your Vanilla Wafer Cookies:
Plating Ideas
1. Dessert Platter: Arrange your Vanilla Wafer Cookies on a beautiful platter. You can add fresh fruits, like strawberries or blueberries, and a sprinkle of powdered sugar for an elegant touch. This not only enhances the visual appeal but also adds a refreshing contrast to the sweet cookies.
2. Ice Cream Sandwiches: For a fun twist, use two Vanilla Wafer Cookies to create ice cream sandwiches. Simply place a scoop of your favorite ice cream between two cookies. This is especially great for summer parties!
Side Dish Pairings
1. Coffee or Tea: Serve your Vanilla Wafer Cookies alongside a steaming cup of coffee or a soothing herbal tea. The combination of flavors will elevate your snack time, making it a cozy experience.
2. Milk Dipping Station: Set up a milk bar with different flavors, such as chocolate, almond, or oat milk. Guests will love dipping their Vanilla Wafer Cookies into their choice of milk, creating a nostalgic and interactive treat.
Presentation Tips
1. Layered Jars: For a charming presentation, layer Vanilla Wafer Cookies in clear jars. You can alternate layers with whipped cream or yogurt and fresh fruit. This not only looks stunning but also makes for a delicious parfait!
2. Festive Touches: If you’re serving these cookies during a holiday, consider adding themed decorations. For instance, use colored sprinkles or edible glitter to match the occasion, making your Vanilla Wafer Cookies a festive treat.
Casual and Elegant Settings
1. Family-Style Serving: Place a large bowl of Vanilla Wafer Cookies in the center of the table. This encourages sharing and creates a warm, inviting atmosphere for family gatherings.
2. Elegant Dessert Table: For more formal occasions, create an elegant dessert table featuring your Vanilla Wafer Cookies. Use tiered stands and decorative linens to elevate the presentation, making it a focal point of your event.
In conclusion, serving Vanilla Wafer Cookies can be both fun and sophisticated. By incorporating these ideas, you’ll impress your guests while enjoying the delightful sweetness of these classic cookies. So, gather your friends and family, and let the cookie magic begin!
Preserving and Reheating Vanilla Wafer Cookies
When it comes to enjoying your delightful Vanilla Wafer Cookies long after they’ve cooled, proper storage and reheating are essential. First, let’s talk about how to keep these cookies fresh and tasty.
Storage Tips
To maintain the crunchy texture and delightful sweetness of your Vanilla Wafer Cookies, store them in an airtight container. This will help prevent moisture from making them soft. If you plan to enjoy them within a week, keeping them at room temperature is perfectly fine. However, if you want to extend their freshness, consider refrigerating them. In the fridge, they can last up to two weeks. For longer storage, freezing is your best bet. When properly sealed in a vacuum-sealed bag or an airtight container, Vanilla Wafer Cookies can stay fresh for up to three months. Just remember to label your containers with the date, so you know when to enjoy them! Also, to prevent spoilage or bacterial growth, always ensure your cookies are completely cooled before sealing them away.
Reheating Methods
Now, let’s dive into reheating your Vanilla Wafer Cookies to restore their classic, crisp texture. The oven is the best method for this. Preheat your oven to 300°F (150°C). Place the cookies on a baking sheet lined with parchment paper, ensuring they are spaced apart. Heat them for about 5-7 minutes. This gentle warmth will refresh their crunch without drying them out. Alternatively, if you’re in a hurry, you can use the microwave. Place a cookie on a microwave-safe plate and cover it with a damp paper towel. Heat it for about 10-15 seconds. This method adds a bit of moisture, helping to keep the cookie soft while warming it up. Lastly, if you have an air fryer, preheat it to 300°F (150°C) and heat the cookies for about 3-5 minutes. This method is quick and will give you that fresh-baked feel. Regardless of the method you choose, avoid overheating, as this can lead to dry cookies. So, whether you’re enjoying them fresh out of the oven or reheating leftovers, these tips will ensure your Vanilla Wafer Cookies remain a delightful treat!
Conclusion
In summary, making Vanilla Wafer Cookies is a delightful journey that combines simple ingredients and straightforward techniques. By mixing together basic pantry items like all-purpose flour, unsalted butter, and vanilla extract, you can create a batch of cookies that are not only crunchy and sweet but also incredibly versatile. Whether you enjoy them as a snack, use them in dessert platters, or even pair them with ice cream, these cookies are sure to become a family favorite. So, I encourage you to roll up your sleeves and give this easy recipe a try. You might just find that baking is more fun than you ever imagined!
Share Your Experience
I would love to hear about your baking adventures! Feel free to share your results, ask questions, or even suggest your own variations. Perhaps you’ll add chocolate chips or nuts for a personal touch. Remember, cooking is all about creativity, and Vanilla Wafer Cookies provide the perfect canvas for your culinary expression. So, gather your ingredients, enjoy the process, and savor the homemade goodness of these delightful treats!
FAQs About Vanilla Wafer Cookies
Here are some common questions about Vanilla Wafer Cookies, along with helpful answers to guide you through your baking journey.
1. Can I use different types of flour for Vanilla Wafer Cookies?
Absolutely! While all-purpose flour is the go-to choice, you can experiment with alternatives like almond flour or gluten-free flour blends. Just keep in mind that this may alter the texture slightly, so you might need to adjust the liquid ingredients accordingly.
2. How do I prevent my Vanilla Wafer Cookies from spreading too much?
To avoid spreading, ensure your butter is at room temperature, not melted. Additionally, chilling the dough for at least 30 minutes before baking can help maintain their shape. If your cookies still spread, try adding a bit more flour to the dough next time.
3. What can I do if my cookies turn out too hard?
If your Vanilla Wafer Cookies are too hard, it could be due to overbaking. Make sure to keep an eye on them and remove them from the oven as soon as they turn golden brown. Also, storing them in an airtight container with a slice of bread can help soften them over time.
4. How should I store my Vanilla Wafer Cookies?
To keep your cookies fresh, store them in an airtight container at room temperature. If you want to keep them for a longer period, you can freeze them. Just make sure to layer them with parchment paper to prevent sticking.
5. Can I add mix-ins to my Vanilla Wafer Cookies?
Definitely! Vanilla Wafer Cookies are versatile. You can add chocolate chips, nuts, or even dried fruits to enhance the flavor. Just remember to adjust the baking time slightly if you add a lot of extra ingredients.